Pictures on Unlocking Updated

CPU Unlocking picture on Unlocking Page updated. Overclocking results and other stuff soon.

Site Revival

Actual content was put to the pages, thus reviving this zone. Asus A7V Settings and Unlocking Socket A CPUs are registered as new articles.

Unlocking Socket A CPUs (2/2)


Mechanical Pencil and a Normal Pencil

Reaction to such idea resulted in the reaction in the form of 'you've got to be kidding!' by many, as I posted the topic in AMDZone's discussion forum. It is true. That simple pencil that may be rolling around in your desk is the key to the lock of the Socket A CPU's multiplier.

The preferred pencil lead is of the normal graphite type, and the hardness of HB. So you can say that it's the average type of pencil found in the stationary store. Too hard a lead, it may do damage to the bridge. Too soft a lead, it may get dull too fast and become unsuitable for our precision job. Sharpen your pencil with a pencil sharpener carefully, and make the tip slightly duller than the sharpest by scribbling it on a piece of paper a bit.

Personally, I prefer using a mechanical pencil ('sharp pencil', as it is known where I live) to a normal pencil. This is because the thickness of the lead is very slim so you won't have to worry about becoming it too dull for our use. Use HB hardness lead on a 0.5mm type mechanical pencil. This should also be a standard thickness for a mechanical pencil, so you won't need to worry about this too much.

Unlocking in progress

The bridges that we need to connect are the L1 bridges on the top right corner of the Socket A CPU. The picture you see above is my Duron 650 getting unlocked with my trustworthy mechanical pencil. The wires attached to the left of the core is the thermistor that is included with Asus A7V, so never mind that. Now let's get on with the unlocking!

You need to see the tiny L1 bridges clearly, so hold your CPU close to your eyes with one hand and hold your pencil with the other hand. While holding your CPU firmly, rub the lead of the pencil back and forth, on top of the bridge. Make sure the lead goes over only one bridge at a time, or we'll short-circuit it with the bridge next to it. Rub your pencil until the lead deposit is fully covering the bridge. It takes about 20~30 seconds to do this. Repeat this on all four L1 bridges. After you're done, it should look like this.
The unlocked Duron 
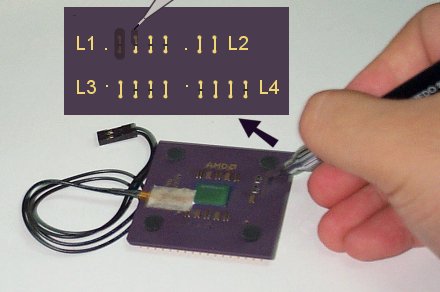
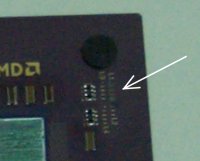
As you see in the picture, the lead should be covering the bridges completely, so the colour of the bridge should be very dark, instead of the usual gold tone. If held sideways, the lead covering should be able to reflect light. Now you've got an unlocked processor. Put it back to Socket A, install the heatsink, and set your motherboard so that manual multiplier selection works. For Asus A7V, refer to my A7V settings page. Boot your computer to see if it worked. If it did, good for you! If it did not, carefully try again.

In a nutshell, there shouldn't be any difference in using pencil in place of conductive pen for unlocking a Socket A processor. Although graphite's conductivity may not be so great as the conductive compound in conductive pen, it does the job just as well since it's used over a very small distance, and since some current just needs to flow through the L1 bridge. Some of you might remember doing conductivity experiment with pencil lead in school or a workshop.

One person suggested that making a current flow through a pencil lead may lead to producing smoke, so it may not be safe. I do remember making a pencil lead burn to crisp, and producing smoke in the process, in a school experiment, but this was done with high voltage and current. The electricity traveling through the L1 bridge is never close to that. I've been running my Duron for days with the system on power 24 hours a day (I coordinate my own RC5 cracking team... ^_^) and I didn't see any smoke during the initial operation nor see my bridges in deteriorated form when I took off the chip to take photos for this article. In other words, the unlocking procedures does not seem to exhibit any problems, whether it be short-term or long-term, if done properly. Of course, I can't take responsibility if your CPU gets damaged by doing this, but even if it didn't work, I would doubt that it would cause any permanent damage to your system's components.

Unlocking Socket A CPUs (1/2)


Changing multiplier is the most effective way to overclock a CPU. However, this can be abused by 'remarkers', who are some disrespectful resellers that remarks the speed printed on the CPU to a higher speed. This way, they can sell the CPU more expensively, as higher speed grade chips are sold with higher premiums. The victims to this scheme are the consumers, who did not actually get the CPU he/she intended to buy, as well as the CPU manufacturer, who cannot receive the profit that they're supposed to receive and have their reputation tarnished since a remarked CPU is running at overclocked setting without knowledge of the customer and thus less stable.

Seeing this as a problem, Intel decided to start locking CPU multiplier permanently on their line of products since Slot1 interface was introduced. So current Intel products can only be overclocked by FSB speed manipulation. AMD, on the other hand, did not take such steps when producing K6-x line of products, although they provided somewhat less overclockability than Intel counterparts.
Intel Pentium II Processor - the first Slot 1 CPU Times have changed, and AMD could not ignore the remarking problem so easily anymore. Predicting the success of their first true performance processor, Athlon, AMD decided to put the multiplier lock also. But it was different from Intel that, although the lock existed on the outside, there were ways to change the multiplier settings inside the cartridge. Upon removing the plastic cartridge, one can plug a 'GFD(Golden Finger Device)' onto a 'golden finger' contacts at the edge of the PCB or move around certain SMD resistors to change the multiplier setting. This has been welcomed by the overclockers' community, but a few very clever remarkers could still abuse this backdoor for their profit.
Now AMD is moving back to the socket type processor with the introduction of 'Thunderbird' Athlon and Duron. Unlike the first-generation Athlons, which came in cartridges and fit into Slot A, these Socket A processors cannot contain neither a 'golden finger' nor SMD resistor for multiplier manipulation since there can only be CPU core, connection pins, and ceramic encasings. It seemed first that it may either be unlocked like the previous socket processors or be locked like the current Intel processors. Now that the actual product has come out and went through scrutinizing eyes of many hardware sites, it has been discovered that the Socket A does not exactly fall into either of the categories. My Locked Duron 650MHz

On the Socket A processors, several 'golden bridges' or set of tiny wires less than a millimeter wide are present with identification such as L3 as you can see in the picture above, at the right and the bottom of the core. The multiplier and the voltage of the chip was determined by how these bridges were cut off by laser in the manufacturing process. This is very good for AMD two-fold; one, they can set the speed they desire after all the assembly and tests are done very easily, meaning less chips are wasted. Two, it will be visually evident if a remarker was to attempt remarking, thus keeping remarking rate to a very low level. Why? The bridges exposed on the surface of the chip, so it is easy to notice, and since they are so small it is hard to cut and connect them without looking tampered.
Asus A7V's FSB and Multiplier Jumpers 
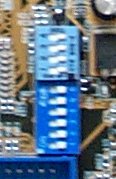
The laser-set multiplier settings were discovered to be adjustable by the motherboard; certain pins from the processor could be controlled so that the multiplier can be set at the user's desire. In case of some motherboards, notably Asus A7V, dipswitches were provided to produce such effect, becoming a choice motherboard for overclockers. Other 'normal' motherboards can still be modified by the user to add a multiplier adjustment support.
Then came the bad news: unlike the processors reviewed by many hardware sites, AMD decided to lock the multiplier setting on retail version of the Socket A CPU in such a way that motherboard dipswitches or modification could not actually change the multiplier. This has been confirmed, and although regional availability may vary, there are now locked Socket A CPUs in circulation.

Of course, the overclockers' community certainly wasn't impressed and compared the locked version to unlocked version to see what was done. It was found that all the 'L1' bridges were cut off by laser on the locked chip, meaning that L1 bridges were the paths to which a motherboard could modify a processor's multiplier. Reconnecting them will revert the locked processor back to the original unlocked state. But how is one supposed to do this?
Hardware sites generally suggested using a conductive pen to connect the bridges. Unfortunately, there are many disadvantages to this. One, it is a bit too expensive just for doing this relatively small job. It costs around $15 (perhaps $20 after shipping) just to get a hold of one of these, and you'll not be using about 95% of the content anyway unless you plan some circuitry creation. Two, it isn't so widely available. I've visited the biggest electronic parts shop in town and they didn't know what it was (for your reference, the population of this town is over a million). Three, some pens produce too think a line for connecting the small bridges we are supposed to tackle. So what was the alternative to this? Read on.
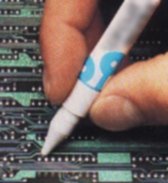
 Conductive Pen in Use

Asus A7V Dipswitch & Jumper Settings

This is a reprint from the old site - the first real article to go online. I'm using this article to test importing of the old stuff over to this new place. 2005-07-06

Asus A7V motherboard is a heaven for tweakers - it offers various control for your system. However, many settings that overclockers love are poorly documented at best. Here are the settings you need to get your CPU soaring high into the overclocking realm.

JEN

1-2 Jumper
2-3 JumperFree

This setting must be set to 'Jumper' mode first to use the settings listed here. Otherwise, set to 'JumperFree' mode and set the jumpers/dipswitches to 'J/F' settings. Doing so will enable you to adjust the voltage and FSB settings in the BIOS, but multiplier setting will not be available.

Voltage Settings

VID4 VID3 VID2 VID1 Volt
0 0 0 0 1.10
0 0 0 1 1.15
0 0 1 0 1.20
0 0 1 1 1.25
0 1 0 0 1.30
0 1 0 1 1.35
0 1 1 0 1.40
0 1 1 1 1.45
1 0 0 0 1.50
1 0 0 1 1.55
1 0 1 0 1.60
1 0 1 1 1.65
1 1 0 0 1.70
1 1 0 1 1.75
1 1 1 0 1.80
1 1 1 1 1.85
* * * * J/F or Default

1 = Short 1-2
0 = Short 2-3
* = Short 3-4


Default voltage setting for Duron is 1.5V and for Thunderbird Athlon, 1.7V. According to AMD's processor technical documentations, changing default voltage by -+0.1V is acceptable.  Exceeding this guideline may have adverse effects to your CPU, although many Durons and Thunderbird Athlons have been reported to be able to run at the maximum voltage listed without much problem when proper cooling is provided.


FSB Settings

Multiplier Settings

1 2 3 4 MHz 1 2 3 4 5 6 Mul
0 0 0 0 111 1 1 0 1 1 1 5.0
0 0 0 1 102 0 1 0 1 1 1 5.5
0 0 1 0 ? 1 0 0 1 1 1 6.0
0 0 1 1 100 0 0 0 1 1 1 6.5
0 1 0 0 109 1 1 1 0 1 1 7.0
0 1 0 1 95 0 1 1 0 1 1 7.5
0 1 1 0 ? 1 0 1 0 1 1 8.0
0 1 1 1 103 0 0 1 0 1 1 8.5
1 0 0 0 110 1 1 0 0 1 1 9.0
1 0 0 1 101 0 1 0 0 1 1 9.5
1 0 1 0 ? 1 0 0 0 1 1 10.0
1 0 1 1 105 0 0 0 0 1 1 10.5
1 1 0 0 107 1 1 1 1 1 1 11.0
1 1 0 1 90 0 1 1 1 1 1 11.5
1 1 1 0 113 1 0 1 1 1 1 12.0
1 1 1 1 100 0 0 1 1 1 1 12.5
1 1 1 1 J/F 0 0 0 0 0 0 J/F

1 = Switch ON
0 = Switch OFF


FSB stands for Front Side Bus, and for Athlon/Duron systems, data is 'double pumped', so the effective speed is twice that is listed here (e.g. 105MHz -> 210MHz effective). FSB is related to memory bus speed as well as AGP and PCI bus speed, so increasing this too much may harm your peripherals that cannot tolerate higher-than-specified speed.

Multiplier shows how much times faster the CPU runs in relation to FSB. For example, setting 6.0 multiplier with 110MHz FSB setting will yield 660MHz CPU speed. Multiplier setting manipulation is better way to overclock than FSB because it overclocks CPU only. However, most retail version of Duron/Athlon CPUs come with multiplier locked at manufacturing. Fortunately, it has been found that unlocking it is easy.

Copyright (C) 1996-2024 Woo-Duk Chung (Wesley Woo-Duk Hwang-Chung). All rights reserved.