Extreme temperature swing leads to EV range swings

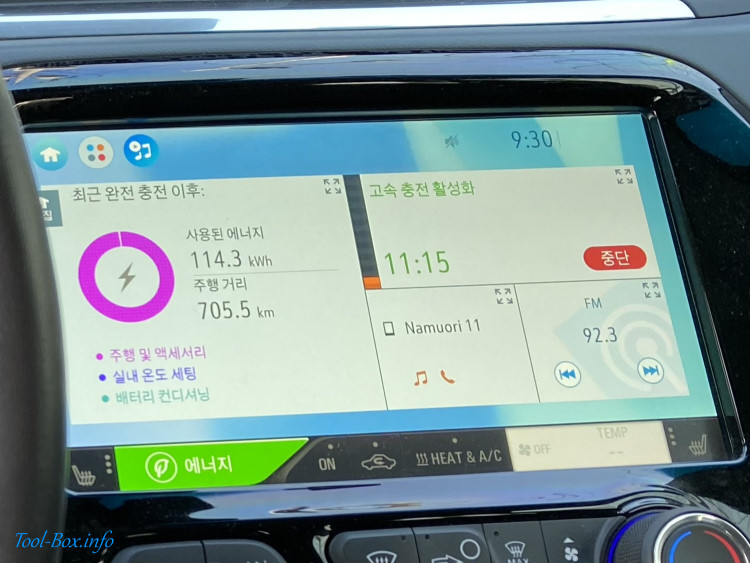
705.5 km driven using 114.3 kWh at an average of -6C (21F)

There have been some wild changes in outside temperature during the past week. On Wednesday, February 17, it dropped to as low as about -10C (14F) and stayed consistently low. In contrast, it went up as high as 21C (70F) on Sunday, February 21. It just so happened that I needed to drive my Bolt EV from Naju to Seoul and back on those days. I did anticipate a big difference in drivable range between them, but it was still a bit jarring to experience it firsthand in such a short period.

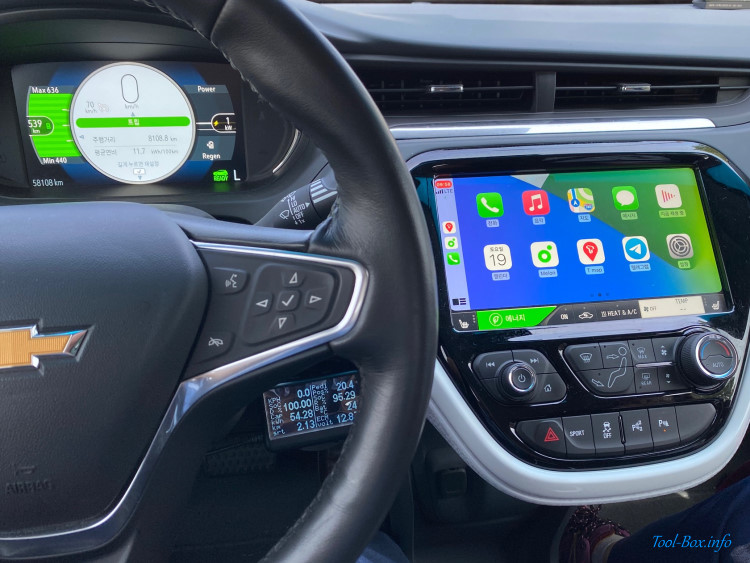
The trips were made mostly on the same corridor of Honam / Cheonan-Nonsan / Gyeongbu expressways, which took up about 80% of the total distance and where I drove at a speed of 100 km/h (62 mph) on the dashboard. On other roads, the speed limits were always observed. I did not use any heating or air conditioning at all, as evidenced by the pie chart on the screen showing that all the energy was spent for driving.

A Naju-Seoul trip, which is roughly 320 km (200 miles) one way, can be made without a pit stop if the temperatures are above freezing. On Wednesday, I saw the drivable range drop considerably shortly after starting out. Although the battery was initially nearly full, I needed to stop and recharge mid-way, just enough so that I wouldn't be late for the schedule. The temperatures stayed between -8C and -5C (18F and 23F).

The return trip was the same - I filled up the car before starting, but had to recharge at the last service area to give myself a bit of safety margin. In the end 114.3 kWh was spent during the total trip distance of 705.5 km (438.4 miles), resulting in an efficiency of 6.17 km/kWh (3.84 mi/kWh). Given that I only try to spend a maximum of about 50 kWh on a single charge, you can see why I had to do the pit stops.
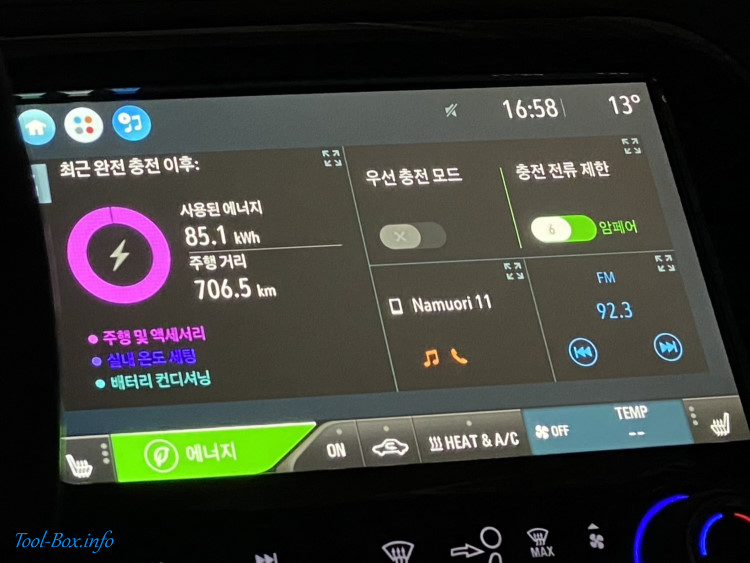
706.5 km driven using 85.1 kWh at an average of 17C (63F)

The situation on Sunday was completely different. It was exceptionally warm for Winter and I could foresee that I would reach Seoul quite comfortably on a single charge. Indeed, the temperature stayed around 20C (68F) for most of the trip until the Sun set. The dashboard showed about 100 km (62 miles) of range left when I reached the hotel.

The next day wasn't much different, although slightly cooler. I was returning to Naju with a full charge while the outside temperature was mostly in the 15C to 20C range (59F to 68F). Total distance of 706.5 km (439.0 miles) was covered using just 85.1 kWh, which gives an efficiency of 8.30 km/kWh (5.16 mi/kWh).

To put this into perspective, the efficiency was reduced by 25.7% just because the temperatures dropped by 23C (42F) and all other things remained more or less the same. Had I used heating, things would have been worse. This highlights how sensitive the electric vehicles are to outside conditions.
Defined tags for this entry: , ,

Adding data display to Bolt EV with UltraGauge MX

UltraGauge MX (bottom center) shows various info next to the iOS 14 CarPlay screen (right)

To keep a detailed log of the Bolt EV's battery status, I've been using a Bluetooth OBD-II adapter that connects to a smartphone for the past two years. While it worked well, I wanted to have a permanent display showing the data and installing an iPhone to do so seemed to be an overkill. So I searched for dedicated "gauge" units that allowed for customization and narrowed the selection down to ScanGauge 2 and UltraGauge MX. The former allowed for more custom data (25 PIDs vs. 8), while the latter had a bigger screen (8 lines vs. 2). I ended up with the bigger screen.

With the device at hand, I had to find a way to program it to display Bolt EV-specific data using the existing custom PID information, and then install it on a place where it is both easily visible and properly shaded. After a bit of work, I was able to fulfill all of the objectives, as you can see in the photo above. The first page shows the actual vehicle speed, accelerator pedal position, various battery information including State of Charge (both raw and displayed), usable capacity, and temperature, as well as current trip distance and 12V battery voltage. Let's see how this was done.
First boot-up of UltraGauge MX

Initially, UltraGauge detects how many of the 60 standard OBD-II PIDs (Parameter Identifications) and 28 self-calculated data it supports are available on the car. Because Bolt EV does not have an internal combustion engine, most of these are irrelevant and unsurprisingly unsupported. Of the 20 said to be usable as shown here, only 7 of them are standard PIDs and none are related to monitoring the high-voltage propulsion battery.
PID # Description Unit
010D Vehicle speed km/h
0121 Distance driven with CEL (Check Engine Light) on km
0130 Warm-ups since TC (Trouble Code) was cleared Count
0131 Distance driven since TC was cleared km
0142 ECM (Engine Control Module) 12V Battery Voltage V
0146 Ambient Air Temperature °C
0149 Accelerator Pedal Position 1 %
So I had to devote all of the eight custom PID slots available for this purpose. The problem is that the screen for configuring them (MENU - Gauge/Page Menu - Select Gauge/Page - M Gauge Setup) looks like this:
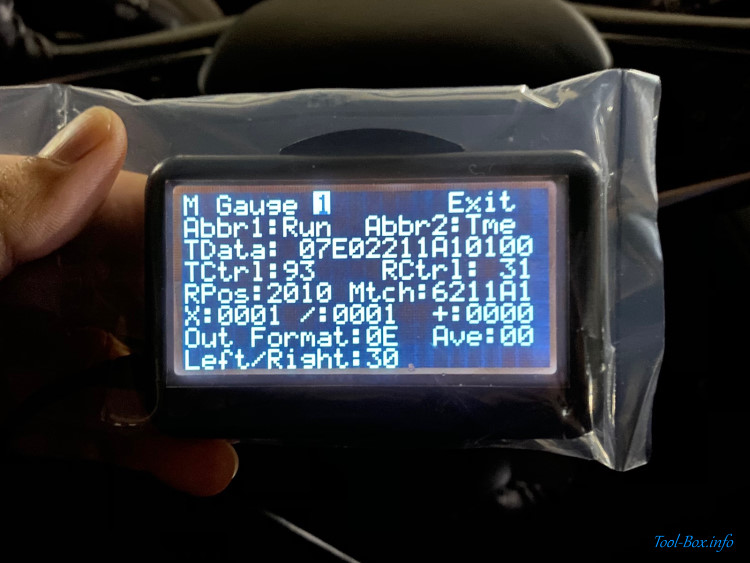
MGauge programming screen for slot 1

And it's not easy to make sense of it at first. I needed to translate the information found in an unofficial list of custom PIDs for Bolt EV into this format. After reading the UltraGauge MX programming supplement and researching the CAN Bus protocol, I was able to do just that. For these PIDs...
PID # Description Unit Formula
228334 State of Charge (Displayed) % A × 100 / 255 + 0
015B State of Charge (Raw) % A × 100 / 255 + 0
2241A3 Battery Capacity (for 2017-18 Bolt) kWh A × 999 / 31250 + 0
22434F Battery Temperature °C A × 1 / 1 - 40
22436B HV Charger Voltage V A × 1 / 2 + 0
22436C HV Charger Current A A × 1 / 20 + 0
22437D Last Charge Amount kWh A × 1 / 100 + 0
2241B6 Battery Heater Power kW A × 1 / 1000 + 0
I programmed UltraGauge like this:
# Abbr1 Abbr2 TData TCtrl RCtrl RPos Mtch X / + Out Ave L/R
1 SoC D % 07E4228334 93 31 2008 628334 0064 00FF 0000 00 00 32
2 SoC R % 07E0015B 92 21 1808 415B 0064 00FF 0000 00 00 32
3 Cap kWh 07E42241A3 93 31 2010 6241A3 03E7 7A12 0000 00 00 22
4 Bat °C 07E422434F 93 31 2008 62434F 0001 0001 FFD8 00 00 30
5 Chg hvV 07E422436B 93 31 2010 62436B 0001 0002 0000 00 00 32
6 Chg hvA 07E422436C 93 31 2010 62436C 0001 0014 0000 00 00 32
7 Chg kWh 07E422437D 93 31 2010 62437D 0001 0064 0000 00 00 22
8 BHt kW 07E42241B6 93 31 2010 6241B6 0001 03E8 0000 00 00 13
You can see that TData is composed of the header and the PID. The header specifies which ECM the data should be coming from and there are at least eight of them (E0 to E7) on Bolt. The numbers used in the formula are entered in hexadecimal, as with other inputs. After making sure that the programmed PIDs were working as intended, I went ahead with the permanent installation of the device.
Continue reading "Adding data display to Bolt EV with UltraGauge MX"

Excessive cellular data consumption in iOS

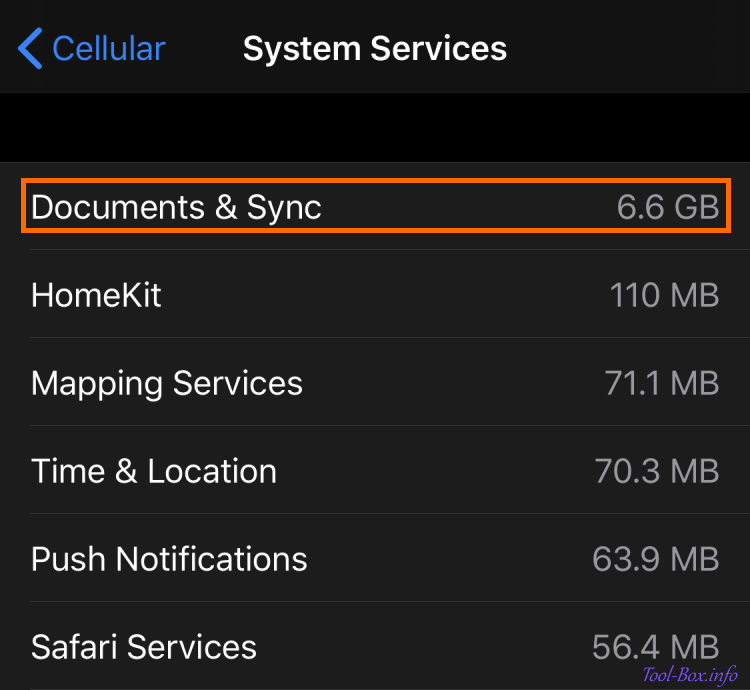
Documents & Sync consumed 6.6GB of cellular data on my iPhone last month

I usually use somewhere between 5 to 7GB of cellular (mobile) data per month on my iPhone because my data plan gives me 6GB and I make sure not to go over too much. But since last December, I started to notice an unintended, excessive data consumption which caused my monthly usage to hover around 9 to 12GB until April. It then subsided for a while, but it came back last month. I didn't want to pay the carrier more than what I actually used, so I decided do something about it.

The root of this problem has been pinpointed to "Documents & Sync" activity under "System Services" category from fairly early on. You can see that it consumed 6.6GB of data by itself last month, out of 11.51GB total. The difficult part was determining what exact services were causing it, since there were many iOS features depending on synchronizing data and documents to iCloud. After much trial and errors, I was able to find two of them which caused most, of not all, of the issues.

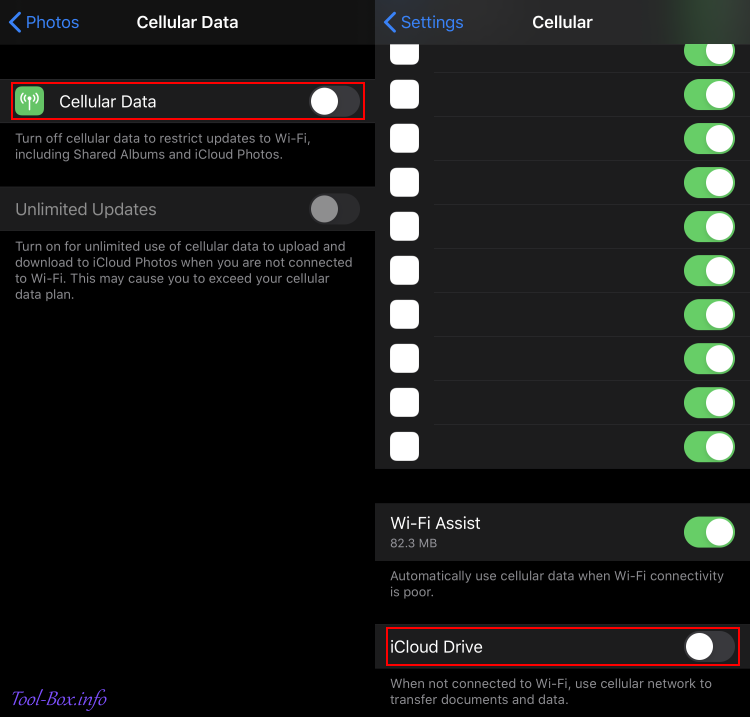
Disabling Photos and iCloud Drive from using cellular data solved the overuse

One was the Photos app using the data connection to update Shared Albums and iCloud Photos. This was a bit strange because I have disabled iCloud Photos and my Shared Albums see barely any activity. Still, it had caused a burst of data consumption from time to time, spending up to nearly 1GB in about 10 minutes in the worst case and making the phone hot in the process. After disabling cellular data option within the Photos entry in the Settings app, these bursts were no more.

The other was the iCloud Drive. When I disabled its cellular data use by using the option buried at the bottom of the Cellular entry in the Settings app, the remaining excess usage stopped. Come to think of it, the data consumed during normal use, be it using the camera, browsing the internet, or interacting with the social media, was roughly twice the previously normal level. So whatever I did, the iCloud Drive was trying to sync some undetermined data in parallel, even though I had no intention of letting it do that. The available space in the Drive did not change, so I would guess it was some sort of system-level stuff.

By the way, the Internet searches I did while trying to fix this problem revealed that a lot of people had similar experiences, but with slightly different solutions. Some people had success by adjusting settings related to iMessages or Keychain, to name a few. So my solution may not be definitive for everyone and you should treat it as a starting point.
Defined tags for this entry: , , ,

Making external storage work on iPhones with iOS 13

- or, why do I get "too much power" error with my drive and how do I fix it? -

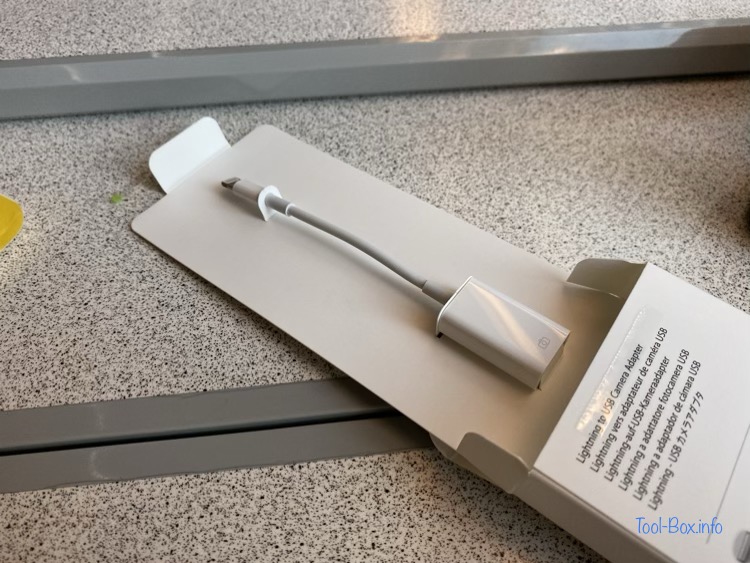
Apple's official Lightning to USB Camera Adapter

With iOS 13, native support of USB external storage was introduced to iPhones. Files stored externally can be accessed from the Files app included in the OS. Other apps can do it as well if it can connect to this Files app. Sadly, modern iPhones' external port of choice is Lightning, which means you either buy a storage device with a Lightning port or get an adapter to connect a USB device. This is where things get complicated.

I bought a Lexar MicroSD to Lightning Reader (part # LRWMLBNL) more than three years ago. It connects directly to the Lightning port and I can open files using a dedicated app. Apple MFI certified storage can supposedly work with the iOS 13's Files app, but that wasn't the case here despite the certification. Adding insult to injury, its app had not been updated in more than two years - the screen resolution and the file sharing functions were outdated. I needed a different solution.

Apple sells many types of USB adapters, one of which is the Lightning to USB Camera Adapter you see above (US$29). It can be connected to a camera for transferring photos and videos, hence the name. Other devices could be plugged in as long as the OS recognizes it, like keyboard, MIDI equipment, or Ethernet adapter. iOS 13 expands this to general storage and mouse.

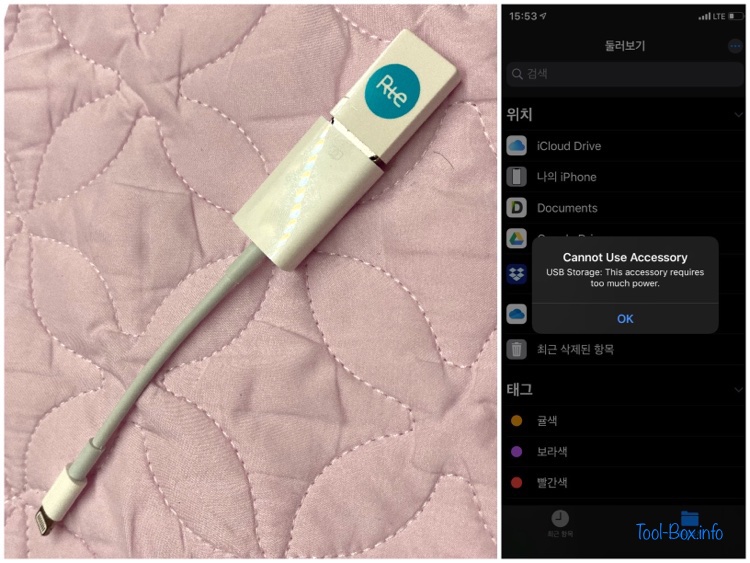
Plugging in a USB flash drive directly do the adapter results in a "Cannot Use Accessory: This accessory requires too much power" error

So I bought this adapter expecting that any low-power storage devices like USB flash drives and memory card reader could be plugged in directly for my file management uses. Boy was I so wrong. Of the multitudes of flash drives and card readers I own, all of them, save for one, caused the "too much power" error you see here. This was bizarre because they shouldn't consume enough power for this to appear. There had to be a reason and a way around this, so I decided to dig in.
Continue reading "Making external storage work on iPhones with iOS 13"

Lighting up Bolt EV's charging port

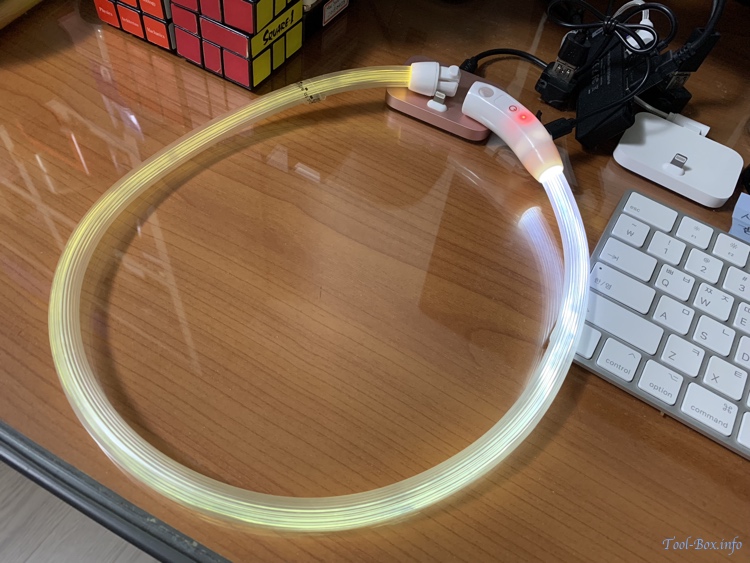
Rechargeable LED dog collar

When I have to charge my Bolt EV in the dark, such as outdoor charging in the middle of the night, the lack of illumination on the charging port makes it hard to plug the charging cable correctly. I saw a video about fixing this with an LED strip, so I decided to try it myself as well. I bought an LED dog collar online for about six bucks (KRW 6,900) that would get the job done.

Charging the collar via USB cable

The collar had a Micro-USB port for charging, and came with a short cable to facilitate it. After I finished charging it (the indicator turned green, from red) I went down to the parking lot.
Continue reading "Lighting up Bolt EV's charging port"

SKT Smart Home: making of a motion sensor

Small lifting electromagnet

SK Telecom's Smart Home device line-up was conspicuously missing a motion sensor. It would have nicely complemented the Jikimi home security devices. Considering that the PIR (passive infrared) sensor itself doesn't cost all that much (some as low as US$2) or complicated to work with, it wouldn't have been so hard to create a product out of it.

It turned out that SKT wanted that as a part of a much more beefed up home security solution called "T View Sense" that came out last month. It's a cloud-connected IP camera with the optional sensor package (motion, door, temperature/humidity, smoke, and carbon monoxide). The sensors requires the IP camera to function because they communicate to the server via the camera's integrated gateway. I appreciate the effort SKT is finally making to counter the IP camera efforts from the other mobile carriers (LGU+ had theirs since 2013), but the pricy nature of the camera (official price of KRW159,000 or about US$140) is off-putting to someone who's just interested the sensor alone.

So I decided to be a bit creative and repurpose one of the existing Jikimi devices into a motion sensor instead. Initially, I wanted to modify the SOS button because it was cheaper. But the fact that the alarm it makes doesn't get differentiated between the buttons made it a deal-breaker. With the door sensor, I needed to simulate the door closing/opening with a magnet, meaning that I could either attach the included magnet to a motor or use an electromagnet to fake such action.

Getting the door sensor to sense the electromagnet

Obviously, I chose the electromagnet because it would be far more simpler if it worked. If it generated enough magnetic field, it would act like the original magnet and cause the sensor to send a "door closed" signal. The problem was that I wasn't sure what kind or how big of an electromagnet would be necessary. After looking at various offerings on the internet, I decided to take a stab in the dark and buy a small "lifting electromagnet" used in machines for picking up metallic items. The particular model I bought for about US$5 was rated for 2.5kg at 12V DC, consuming 3W. The model number KK-P20/15 apparently indicates a 20mm outer diameter and 15mm thickness.

12V was tad higher than what I wanted, but the electromagnet works at a lower voltage with reduced pulling power. All I needed to know was whether that pull is just enough to trick the sensor, so I created a quick testing platform with my kids' electric circuit kit. As you can see here, 3V was just barely good enough for the sensor to activate. At 6V, it worked more reliably. This confirmed two things - the electromagnet I had was fit for the job and that I could make it work with a battery pack, e.g. single-cell Li-Ion battery (3.7V nominal).
Continue reading "SKT Smart Home: making of a motion sensor"

Disable camera shutter sound on iOS 10.0.1

Select AssistiveTouch as Accessibility Shortcut (left), then leave "Mute" as its only top level menu (right)

iPhones and iPads bought (or intended to be sold) in either Korea or Japan has the camera shutter sound forcibly turned on at maximum volume no matter what sound setting is used. I've noted this three years ago. This is due to local regulations, but even making a screenshot causes the same sound, which is inconvenient.

Recently, though, someone at Ruliweb has posted an interesting tip that can override this if you're using iOS 10.0.1. I would like to share this information here.

1. Run Settings app and go to General > Accessibility

2. Scroll to the bottom and enter "Accessibility Shortcut" option. Select "AssistiveTouch".

3. Back in the Accessibility menu, scroll up to the middle. Find and enter "AssistiveTouch" option.

4. Enter "Customize Top Level Menu" and remove icons until there's only one left. Select "Mute" for this icon. (If you leave two or more icons, this tip will not work.)

When you triple-click the home button, a small floating AssistiveTouch button will appear on the screen. When you press it, the system sound will be muted completely, including the camera shutter sound and alarm. Pressing the AssistiveTouch button again will re-enable the system sound, and triple-clicking the home button will hide the AssistiveTouch button.

In a nutshell, you can use AssistiveTouch to disable or enable camera shutter sound at will. User reports indicate that the tip works across all devices, including iPhone 7 that I personally confirmed. However, it doesn't seem to work on iOS 9. Therefore it isn't clear if this is a bug or an intended effect. Use at your discretion.
Defined tags for this entry: , , , ,

Copyright (C) 1996-2024 Woo-Duk Chung (Wesley Woo-Duk Hwang-Chung). All rights reserved.