Alpha PAL6035 vs Zalman CNPS3100-Gold (2/4)
Posted by Wesley on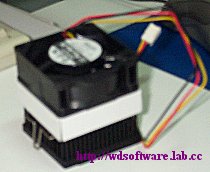
PAL6035 is a socket HSF from Japan's Alpha Company Ltd.. Alpha has been producing high quality heatsinks with their 'microforging' technology(hence the URL) that enables them to make create heatsinks of efficient shapes since 1989. PAL6035 is one of the top performing heatsinks they offer, second only to PEP66. Here are some key specs of PAL6035:
| Specification | |
|---|---|
| Dimensions(mm): | 60 x 60 x 35 |
| Mass (grams): | 175 |
| Cooling Fan: | Sanyo Denki 60mm |
| Fan Speed(rpm): | 3800 |
| Fan Power(cfm): | 20.0 |
| Thermal Resistance: | 0.37 C/W |
The specifications reveal that the heatsink is quite a competent model, and it has consistently proven to be well-performing throughout various tests performed by hardware sites such as HardOCP or Tom's Hardware. So we can say it is a good 'reference' high-performance HSF.
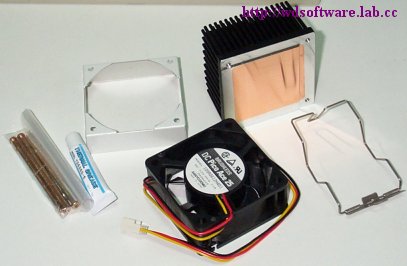
Alpha PAL6035 comes completely unassembled, in part because you assemble the heatsink as you install it on the CPU. In the picture, you see the black-anodized heatsink with Alpha's unique copper-plated bottom. You also see the heatsink cover for effective airflow, as well as the 20cfm Sanyo Denki 60mm fan. This fan is standard part of the PAL6035MUC package that Alpha sells directly. If you get PAL6035 from other places, it may be replaced with different fans. The clip shown here is the old kind, and Alpha has updated the clip for better compatibility with AMD's SocketA CPUs. However, with a bit of bending, the old clip works with SocketA fine. To wrap up the packaging, there is a set of screws for attaching the fan onto the heatsink and Alpha brand thermal grease in a tube.
Installing Alpha is something of moderate difficulty, but not confusing. First you put the clip into the heatsink, then attach it onto the processor. Depending on how dexterous the person is, you can push the clip down with a finger and snap it into place, or a small flathead driver may be necessary to aide/guide the clip in. That's the hard part. Then you put on the cover and screw on the fan to finish installation to get it look like the picture above. Unlike the picture, you have to plug the fan connector in to get it work, of course.
Now let's take a look at the contender.