Making of the Portable Athlon (4/10)
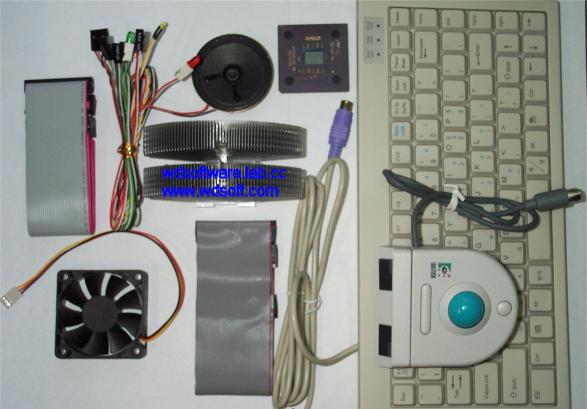
Posted by Wesley onTo keep up with the portability theme, the good old 106-key Windows standard keyboard (this is the case for Korean keyboards; one key for English-Korean conversion and one key for Korean-Chinese conversion are added to the default US keyboard layout)was not to be used. If you've ever used a notebook computer and complained about the tight keyboard it has, you know how huge a normal keyboard can get. Those 'natural' keyboards with twisted key arrangements or those wacky 'internet' keyboards with superfluous buttons are even bigger. BTC was selling some 'specialty' keyboards such as mini-keyboards and wireless keyboards, so I got myself the mini-keyboard from them. Not surprisingly, this keyboard's characteristics were remarkably similar to that of a keyboard integrated in a notebook, and the Logitech TrackMan portable trackball I've been using with my old 486 notebook (not the one pictured in the first page, though) clamped perfectly to the side of the keyboard.
Then it occured to me that, in order to make a computer case, I needed some LEDs and buttons and the dinky beeper-speaker. Since these come standard when you buy a computer case, I never gave much thought to them, but now that I'm the one making the case, I needed to supply these on my own. Fortunately, the Yongsan electronics market is chock full of all computer parts, and I effortlessly obtained the necessary parts from a store that sells computer cases as 'replacement' parts for a couple of bucks.
For the heatsink, I bought a Zalman CNPS2005 flower heatsink, as a website was doing a group purchase on these coolers and got it on a good deal. However, I couldn't use the 80mm fan that came with it because it would be too large; I pulled out a 60mm fan I keep for testing for use with it. The Duron CPU has not been arrived at the time of the photo, so my t-bird CPU was shown instead.
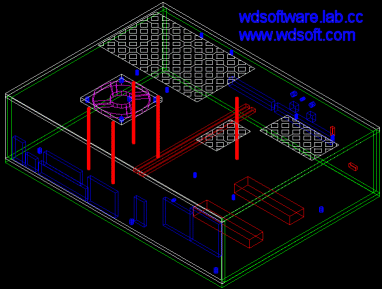
With most parts pretty much on my hands, I needed to revise my original thoughts of the casing with actual measurements and positioning. Though the measurement I had did not differ significantly, the positioning of the components revealed that my initial design had some flaws. Also, my dad hinted that my design was rather complex, and told me to make it as simple as possible so that it won't be so difficult to make or become fragile. His words were to be taken seriously, as he's an engineer. I took my original design and simplified it so that it could be made from just six panels, not the original eight. Then I somehow needed to visualize my design. I needed a CAD program. I downloaded a freeware CAD program from the web, took a 30-minute crash-course on using it with the internal tutorial, and came up with this.
Would this design survive? We'll see...