Wearable Computing Project (6/10)


Clear Acrylic Casing for the Components

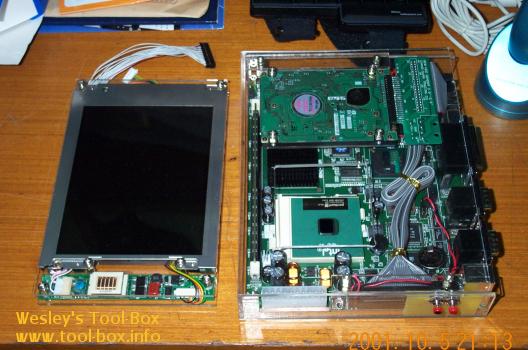
As usual, I chose to use the clear acrylic board ('Plexiglas') to house the components. As you can see in the picture, both the monitor and the main system looks quite nice in their casing. Because I now had some experiences with crafting the boards (I took a crafting class this semester) and I got myself a handheld electric drilling machine and some board cutting knives, I needed little help in creating the casing this time around.

Draw your attention on the monitor. It has two unconventional data cable sticking out of it; this is the native 32-pin digital data cable and the 10-pin power line of the LCD panel. These need to go through the conversion interface I've made earlier before being hooked into the motherboard. So I did do that, and boot up the system... and what gives? The LCD panel was going haywire. I had double-checked the interface board so as to not have any misconnections, so I was pretty sure I didn't make a mistake on my part. Therefore, I called the Eunpa and Maxan about this situation. After a bit of digging in, it turned out that the BIOS of the motherboard did not have proper support for my LCD panel yet, and the problem wasn't going to be addressed any time soon.
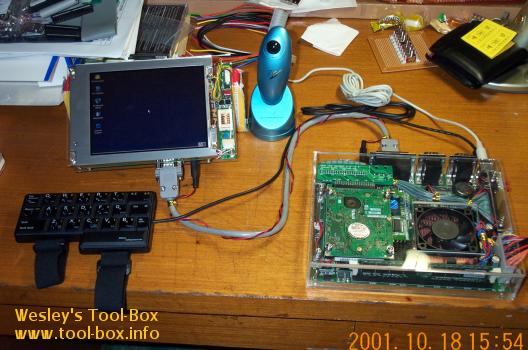
First successful operation of the whole system

That was rather disheartening, as it meant the simplistic digital connection wouldn't be possible and I had to resort to analog-digital conversion of the video signals. I contacted Eunpa for an Analog-Digital Converter board, I could get it about a week later. Because of the dimensional constraints on the main system, I opted to add the ADC behind the LCD panel. This increased the thickness of the monitor by two times. It wasn't very elegant, but it was the only option I had at the time. But as you can see, at least the LCD panel displayed the screen properly. Finally! I was still annoyed about using the thick analog monitor cable, but I proceeded onto installing Windows 2000 and the whole setup went smooth.

Now came yet another big block in the creation of the wearable. I needed to power the system with a DC voltage input (i.e. battery). Despite the small size of the motherboard, it still used an ATX power connector for its power needs, and I've yet to come across an ATX power supply based on DC input. As you would all know, the casual power supply you can buy are plugged into an AC power outlet, not to mention big. I couldn't move around freely if I needed to plug my system into a power outlet (this is the obvious problem in my Portable Athlon). Also, even the smallest power supply out there, designed for 1U server, was too big to fit into my system. So I needed to tackle a two-fold problem of making a power supply small enough to be housed within the system, while it gets a DC voltage input.

Of course, trying to search for a ready-made product that meets such needs would be futile, and thus I decided to design a power supply of my own. With the electrical knowledge I've learned so far at school, and studying the ATX specification from Intel, I designed a circuit board capable of a single DC input and triple DC output, with the on/off control managed by remote-on pin, as ATX specification pointed out. This feature is necessary for software controlling of the power, e.g. if the operating system was to successfully turn off the system at shutdown. Using some high-efficiency DC-DC converters and some SSC (solid-state relay) I crafted a circuit board that followed my electrical design while conforming to the size constraint imposed in my system casing.
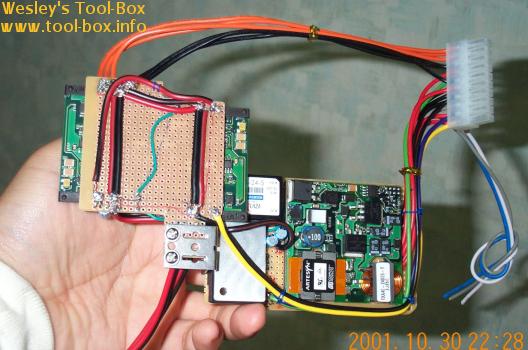
Custom-design ATX power supply

The said size constraint forced me to make the components be laid out in two bread boards, then linked together at different height at the middle. This way, one half of the circuit could come under the hard disk area, avoiding a short-circuit.
Wearable Computing Project (5/10)


Initial testing for well-being of the components attached

What is missing in this picture? That's right. This computer did not have a dedicated monitor, and had to borrow the monitor from the Portable Athlon. You'll also notice that a Zalman CNPS3100G (review) was sitting on the CPU, which easily exceeded the height limit of 4cm. The particular heatsink was placed there simply because the intended heatsink, Alpha PAL153U, had not arrived yet. This heatsink was only 2.5cm in height, and passed the height requirement. You'll see this heatsink attached on the system later on. Back to the monitor problem, the trouble was that the monitor had to be either directly attached to the system, or had to be worn somehow. Knowing that the former solution wasn't viable due to the uncertainty in how the system was actually going to be worn at this point, I opted for the latter, meaning I had to find a monitor small enough to be worn... on my left arm. So the 'other attachment' was going to be a monitor.

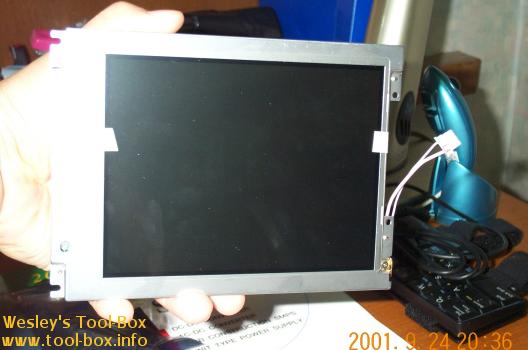
The LG.Philips 6.4" LCD Panel in its raw form

Some product browsing at LG.Philips LCD website revealed that their 6.4" LCD with VGA resolution, LP064V1, was the only model that seemed to meet the size requirements. While VGA resolution of 640x480 does not seem a lot, achieving even this resolution at 6.4" screen size meant that the pixel pitch had to be 0.20mm, which is one of the finest in the industry. Incidentally, this monitor was also intended for industrial application, like the motherboard.

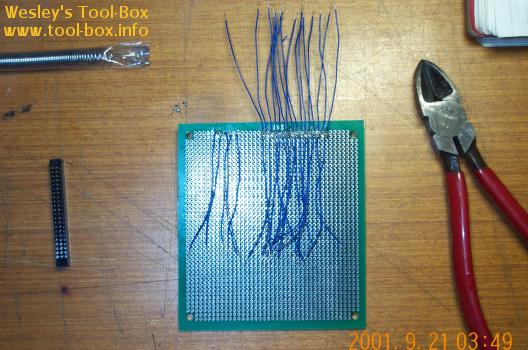
I asked LG.Philips LCD for purchasing information and they directed me to Eunpa LCD, their primary distributor. I visited their office and after some explanation, I was able to get my hands on the said LCD panel. They usually didn't sell these kind of LCD panel to individual user due to their special application. Since the motherboard had a native LCD panel output header, I decided to create a direct link between the LCD panel and the motherboard. Unfortunately, the pin out order was completely different, so I had to make a conversion interface circuit board for translating the pin outs. As you can see in the picture, this was no easy task, involving in interconnecting about a hundred end points on a small breadboard.

The tedious creation of an LCD interface

Now the main components for the project seemed to have all been gathered. But they were all in their bare forms.

Wearable Computing Project (4/10)


When the computer is being used while being 'worn', the input devices must be on the user's body in some fashion, as they would not have a solid surface to be placed on like the traditional keyboard and mouse. This departure from the conventional placement of input devices had been immediately on my mind after the motherboard was chosen. Using a mini-keyboard similar to what I have on my portable Athlon deemed too bulky, despite its relative smallness. Those flexible rubber keyboards that you could fold around came up next, but I found the keys very uncomfortable to type, especially while being attached to my body. So I did a search for mobile input devices, and I came across HalfKeyboard from Matias Corporation.

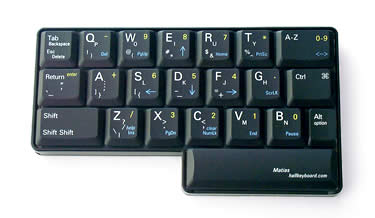
Matias HalfKeyboard Normal Version

It had only half the keys of a traditional keyboard, but because of its unique design, it enables the user to type any key present on a normal keyboard with only one hand. I found this product to be a perfect thing for my project, and despite the hefty price tag of $300, I immediately ordered a wearable version.

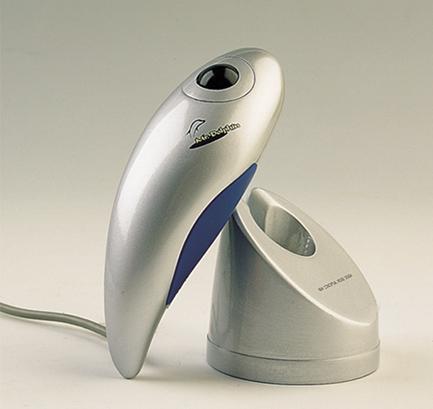
Then I needed a pointing device. I vaguely remembered a certain mouse that you could put on a finger to control the cursor, but I couldn't remember its exact name or form, so I gave up and I tried to look for a similar device. Interestingly, Logitech had the solution, with their TrackMan Live! presentation trackball which could be held in one hand to control cursor movements. But the local distributor no longer imported this product due to the extreme unpopularity. I thought I hit a wall at this point, but searching various shopping sites revealed a handheld trackball called 'Little Dolphin' from J&J Magnetic. This one was small enough to be easily fit in one hand (TM Live! seemed tad big for my small Asian hand), and only cost about $12. This was a fine pointing device of choice in a mobile situation, I thought.

J&J Magnetic's Little Dolphin Trackball

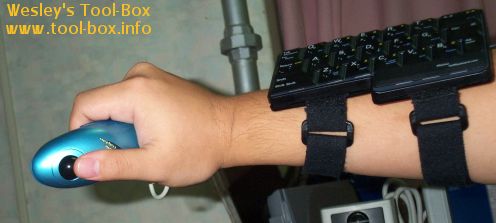
I had to wait about a week for the HalfKeyboard to arrive from Canada so I could try on the actual functionality of these devices. The package eventually arrived, and I immediately put them on. It took a bit of time to get used to, but I found my choices of devices to be quite satisfactory for its intended purposes.

Wesley is trying out both of the devices

As you can see, both devices could be worn on one arm, leaving the other arm free for other attachments. I just had to make sure the 'other attachment' did not conflict with the use of the left hand for using the keyboard. Functionality of the input devices being confirmed, I attached a 2.5", 20GB(Model MHN2100AT) Fujitsu hard disk, which would function as the main data storage on the motherboard so I could install an OS (certainly not Windows CE, mind you).

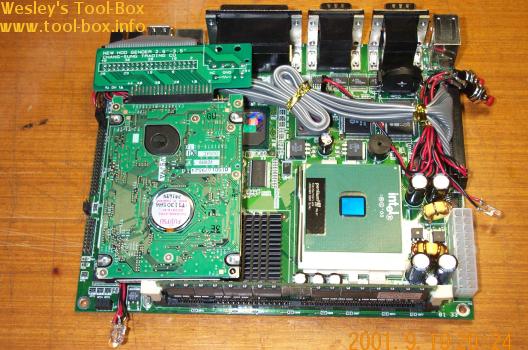
The MSC-740B with the Fujitsu Hard Disk

Notice the IDE cable needed to be shortened a bit to save room. I took care of this part later by buying a custom-ordered IDE cable with proper length. Also, you can see some LED's sticking out at the bottom of the hard disk. These are LAN signal lights. I later removed these mainly because it seemed rather unnecessary. The other LED, to the right of the CPU is the HDD access light, and remained at its place. It was a high-intensity blue LED from Toyoda-Gosei. The buttons at the top right are Power and Reset switches, naturally.

Wearable Computing Project (3/10)


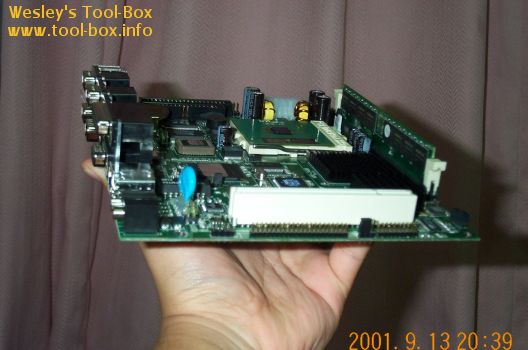
The MSC-740B, with the P-III 933MHz

The MSC-740B motherboard looked really spiffy, and I could stare at it all day, but I needed to move on so I could do some initial tests to examine the board's characteristics. On the specification sheet, it said:

- CPU: FC-PGA Pentium III and Celeron up to 1GHz
- Chipset: Intel 440BX Chipset
- Memory: One DIMM Socket for SDRAM up to 256MB
- Video: Trident BladeXP with 16MB RAM (3D and DVD Support)
- Storage: One EIDE Channel (UDMA/33), One Floppy Interface
- Ports: 2 USB, 1 Parallel, 4 Serial (yes, four.. it is evident in the picture)
- Input: PS/2 Mouse and Keyboard
- Display: D-Sub 15pin Analog & TTL/LVDS Digital (for LCD Panel)
- Network: Realtek RTL8139C (10/100Base-Tx)
- Sound: Crystal CS4281 PCI Sound Interface


So the motherboard wasn't so lagging behind in technological aspects that much, which was more than I could ask for since it this board was designed for industrial use. I got myself an Intel Pentium III 933MHz CPU and a KingMax PC133 256MB SDRAM. I chose KingMax primarily because of the height limit I was setting for this project; the whole thing must not exceed 4cm including the casing. Since a regular DIMM module already gets close to the limit itself, the KingMax's low-profile (2.5cm) DIMM design was the only choice. The Pentium III part was a bit of a disappointment for me, being a big supporter of AMD chips. But in this corner of motherboard industry, Athlon wasn't being considered at all for a motherboard design yet, and so I had to settle with a Pentium III. The upside was that the performance / power-consumption ratio of a Pentium III is great, and less heat would be generated, which should provide more design headroom.

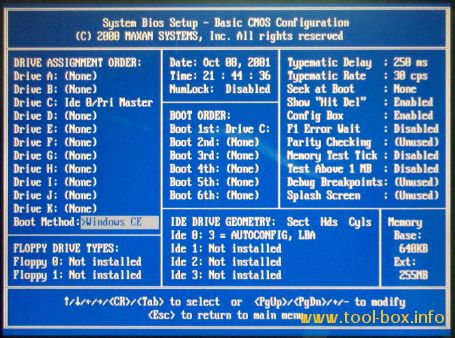
I plugged these in and confirmed that the motherboard functioned correctly, but I noticed that something looked very wrong. The BIOS setup screen was not the usual Award / Phoenix BIOS that most of us got used to. The designers of this motherboard picked a General Software BIOS instead, apparently because of its industrial nature. Not only do you have a choice of assigning a physical drive to a drive letter, you can determine the boot order very liberally. And notice the Boot Method part: you have the option of running Windows CE! You don't see this kind of option every day. However, it did have the downside of apparently not supporting CD-ROM booting. Also, Maxan never designed this motherboard to be tweaked, and the BIOS, as well as the on-board jumpers had no performance tweaking option at all. A sort of 'tweaker's nightmare', so to speak. I'll get to this aspect later on.

MSC-740B's Unique BIOS Setup Screen

Wearable Computing Project (2/10)


Shortly after returning from the recruitment camp in September, I contemplated on the creation of a computer that could be worn, much akin to wearing a clothing, if possible. This would set the goal of of the resulting system that was both small in length & width, light, and relatively flat. While I found that a modern laptop computers were close to meeting these parameters, I decided not to base my new system on one. First, most modern laptops feature a large display which increased the overall length & width and exceeded my plans. Second, I would want the input and output devices separate from the main unit so that I could use it without having to put the system on a surface somewhere. Third, a laptop computer, even today, is basically a 'ready-made' unit straight from the manufacturer. It does not need work on my side to make it work in the first place. Being a computer freak who's built many custom systems, this is extremely unacceptable. Well, many of the fellow freaks can understand me on this, I'm sure.

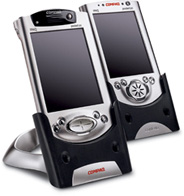
Now the PDA's came to mind. A today's PDA has full-colour display, has an embedded processor running up to 200MHz, runs Windows-like interface, and has lots of applications that mirror a 'normal' computer's counterpart. They're quite small enough to be 'worn', so to speak, being put into a pocket when not in use. This side of the spectrum sounded good, but was not without shortcomings. Basically, most of the units have very small screens, and running Windows CE or PalmOS, it has reduced functionality compared to a desktop OS. Not to mention I would have to forfeit the use of many of the usual programs I've been accustomed to using. A PDA is a far cry from being a replacement of a true desktop computer. And I've not even mentioned the storage problems. I wouldn't call a PDA a 'computer', so to speak, in these aspects, and therefore was ruled out from selected for use.

Compaq's iPaq PDA

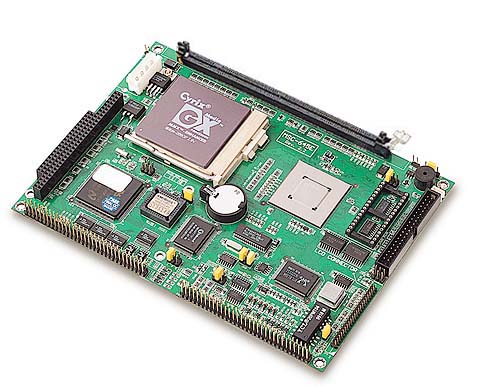
This pretty much narrowed my choice for building a wearable computer. I need a small motherboard. And a small display. And a small keyboard. And a small pointing device. First things first, I had to find a small motherboard to work my dreams on. This reminded me to search for that myriad of catalogs I had gathered at the trade shows I had visited in the recent years. A single brochure had immediately caught my attention, that of a company called Maxan Systems. This company featured a range of custom-design motherboards built for mainly for set-tops and industrial computers. Naturally, the typical dimensions of the motherboards they made were generally quite smaller than a conventional computer motherboard. I definitely needed to pay this company a visit. Fortunately, this company was native to my country.

One of Maxan's Geode based mobo, MSC-645E

The office location was a bit elusive, though, and I had to take a long trip by taxi. I found out later that it could be reached easily by a bus (and that which also stops near my dormitory, adding insult to injury), though. I had some lengthy talks about how I need a Maxan motherboard for my project, and how I could browse through the recent products (the catalog I had was apparently old and outdated). The marketing manager showed me the updated catalog so that I could find my motherboard of choice easily. It was deemed that their MSC-740B and MSC-735 models were fulfilling most of my requirements; both were very small, supported Pentium III-level CPU, had 3D capability, and had native LCD panel support. I was sort of leaning on the 735 as it had smaller dimensions, but he explained that the 735 never went into full production and was not a viable choice. Hence my choice was pegged to the 740B. Fortunately, they had some of these models in boxes in the storage room, and I was able to buy the motherboard right on the spot using electronic payment. It was rather expensive, making me $300 poorer, but I felt really good about it.

Copyright (C) 1996-2024 Woo-Duk Chung (Wesley Woo-Duk Hwang-Chung). All rights reserved.