Entries tagged as Jupiter

Triple planet observation

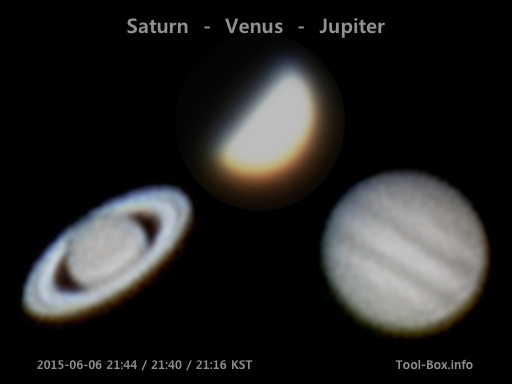
Saturn, Venus, and Jupiter in a single sighting

On the Memorial Day in Korea earlier this month, the night sky was clear and had three planets shining brightly in the sky at the same time. I took my astrophotography equipment outside and got some burst mode photos of the planets.

It seemed that Venus was quite bright and the default camera app didn't have enough adjustments available to make it dark enough to reveal any details on the half-disc. Also, Jupiter now being in the lower altitude hampered the details somewhat. Other than that, things turned out fine. It was nice to have a direct comparison of the apparent sizes between the planets.

Telescope: Celestron NexStar 6SE + 5mm eyepiece
Device: iPhone 6 Plus (afocal)
Filters: None
Location: Naju, Korea
Stacked with RegiStax 6.1.0.8

Saturn
Settings: 29mm - ISO 400 - 1/15s - f/2.2
Time: 2015-06-06 21:44 KST
30 photos

Venus
Settings: 29mm - ISO 250 - 1/30s - f/2.2
Time: 2015-06-06 21:40 KST
100 photos

Jupiter
Settings: 29mm - ISO 320 - 1/30s - f/2.2
Time: 2015-06-06 21:16 KST
100 photos

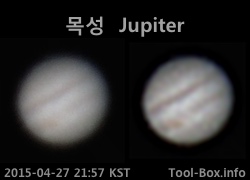
Jupiter photo from iPhone's video shoot

Processed image of Jupiter from an iPhone 6 Plus video recording

Lots of planetary photos from amateur astronomers seem to be derived from a small video camera attached to the telescope. I do have lots of smartphones that could serve a similar purpose, so decided to make use of them instead. Holding it steady in front of the eyepiece was a problem, as evidenced by my earlier attempt, so some sort of an adapter was needed.

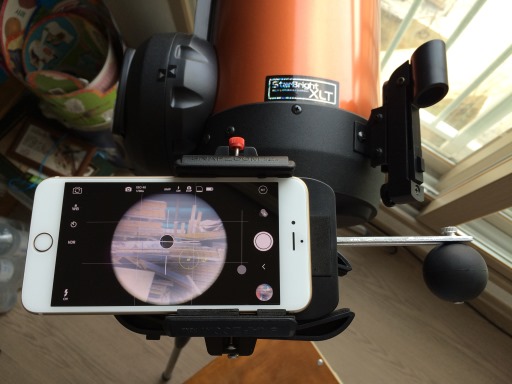
Attaching iPhone 6 Plus to Celestron telescope with Snapzoom adapter

This is where Snapzoom digiscoping adapter came in. I originally bought this several months ago to photograph stars using binoculars, but it could be made to work with telescopes by attaching an included weight. After lots of paddings here and there, my iPhone 6 Plus was able to fit into the adapter and work with the eyepieces that I owned.

Once my NexStar 6SE telescope was aligned with the stars so that I could track any celestial objects, I slid the phone-adapter-eyepiece assembly into the telescope and began looking at Jupiter and the Moon, the biggest targets.


And this is how Jupiter showed up on the screen. The bands and the Great Red Spot were faintly visible, just as I saw with my naked eyes. The shakiness due to the atmospheric turbulence was also quite apparent. I recorded the sight for two minutes and processed the resulting video through PIPP. Finally, the processed video was stacked and sharpened with RegiStax. The final result, as you saw at the beginning, has a more "natural" feel than the ones from SX50 HS for some reason.

Telescope: Celestron NexStar 6SE + 5mm eyepiece
Device: iPhone 6 Plus (afocal)
Settings: 29mm - 1920x1080 - 30fps - f/2.2
Filters: None
Time: 2015-04-27 21:57-59 KST
Location: Naju, Korea
300 frames stacked with RegiStax 6.1.0.8

First good Jupiter shots from NexStar 6SE

Getting sharper image of Jupiter from SX50 HS without using integrated zoom

After fixing the collimator screw problem, I spent some time getting my Celestron NexStar 6SE properly collimated. To see if this improved the sights, I pointed the telescope to Jupiter. Sure enough, I could see the details of the clouds on the surface much better. I could even make out the Great Red Spot.

I wanted to capture this on camera, so I attached my Canon EOS 450D DSLR directly to the telescope tube for some prime focus astrophotography. But for reasons I still haven't figured out yet, the photos couldn't resolve any details - the planet was just a yellowish disc. I'd have to take photos of the Moon to see what's going on in the coming days.

Still, I didn't want to waste a good sighting opportunity, so I pulled out my usual astrophotography gear, SX50 HS, and took the photos of Jupiter through the eyepiece and the barlow lens attached to the Celestron NexStar 6SE without using the optical zoom. This yielded a pretty good result, especially considering that I just held the camera up the eyepiece by hand. The disc is also about 2.75 times the diameter compared to what would've been possible with the camera's integrated 50x zoom (0.53 vs. 1.46 arc seconds).

Telescope: Celestron NexStar 6SE + 25mm eyepiece + 2.5x barlow
Device: Canon SX50 HS (afocal)
Settings: 24mm - ISO 80 - 1/80s - f/3.4
Filters: None
Time: 2015-03-27 01:14 KST
Location: Naju, Korea

Comparing planets' apparent sizes

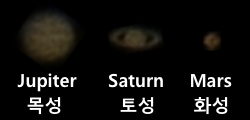
Jupiter, Saturn, and Mars as seen on the same night

Planets shine bright even under a washed-out city sky, so I've gotten around to photographing them often. But it has only recently come to my mind that maybe I should take many of them in a single night and see how different the apparent sizes are at the (almost) same time. Last night was cloud-free, so I got around to actually carry it out.

So here's Jupiter, Saturn, and Mars. Venus was considered, but the nearby buildings blocked the view and I wasn't dressed to venture outside at the time. I did photograph the Moon while it was close to Jupiter. But it's too big to display it along with the planets, so that'll be up on another post.

Jupiter is the biggest, as expected, and it'd always be the biggest round planetary disc found in the Earth's sky. Currently, Mars looks slightly smaller than Saturn without its rings. When it makes a close approach to Earth, though, it can look bigger than Saturn.

Device: Canon SX50 HS
Settings: 1200mm (2x enlarged) - f/6.5
Filters: None
Time: in KST
Location: Suwon, Korea
Stacked with RegiStax 6.1.0.8

Jupiter: 2014-03-10 23:38, ISO 160 - 1/80s, 17 photos
Saturn: 2014-03-11 05:40, ISO 160 - 1/40s, 15 photos
Mars: 2014-03-11 05:52, ISO 80 - 1/160s, 15 photos
Defined tags for this entry: , , , , ,

Processing small photos of the planets

Enhancing Jupiter shots from SX50 HS

I've been using my Canon SX50 HS superzoom camera almost exclusively as an astrophotography machine since middle of last year. The 50x zoom is enough to make many of the planets show up as disks rather than spots, so it feels like having a compact telescope with integrated camera. At full zoom, the settings are at 1200mm, f/6.5, and ISO is set to 80 for best quality. Jupiter shots are usually taken at around 1/100 to 1/250s shutter speed (it was 1/160s here), while bright Venus shots can go up to 1/1000s.

Of course, even such massive zoom by camera standards don't make the planetary disk very big. two biggest examples are Jupiter, which goes up to about 32 pixels wide, and Venus, about 41 pixels wide. So getting good details from a single shot is difficult. I have to apply some techniques used by the astrophotography community to enhance the results.

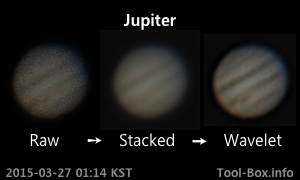
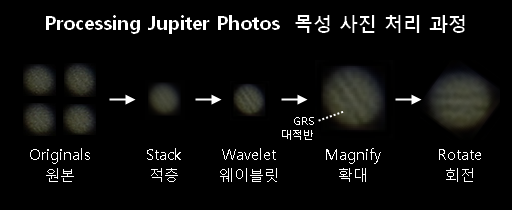
The big helper is undoubtedly RegiStax, which does both stacking and wavelet processing. The stacking averages the multiple photos of the same object, which preserves the details while reducing noise. RegiStax doesn't simply stack the photos, though. They are aligned and only the ones with good quality are picked out for stacking, which improves the quality even further.

In this Jupiter example, I took 131 photos of the planet, out of which 41 of them were picked by RegiStax for stacking. Compared to the grainy photos originally taken by the camera, the stacked image is much more cleaner and smoother. But the cloud features are soft and hard to make out. This is where wavelet processing comes in.

Wavelet processing can be used to amplify the little details in the photos and make them stand out. After making some adjustments on the strength of each wavelet layers, the cloud features became more distinct. There's a ripple in the lower part, and magnifying the processed photo by 200% shows that this is the Great Red Spot (GRS). Rotating the photo (by 54 degrees in this case) makes the planet look "upright".

And this is how I currently process the planetary photos.

Settings: 1200mm - ISO 80 - 1/160s - f/6.5
Time: 2014-01-19 02:57 KST
Location: Suwon, Korea
Defined tags for this entry: , , ,

Copyright (C) 1996-2025 Woo-Duk Chung (Wesley Woo-Duk Hwang-Chung). All rights reserved.