Entries tagged as FLIR One

FLIR ONE Pro - Inside Uses

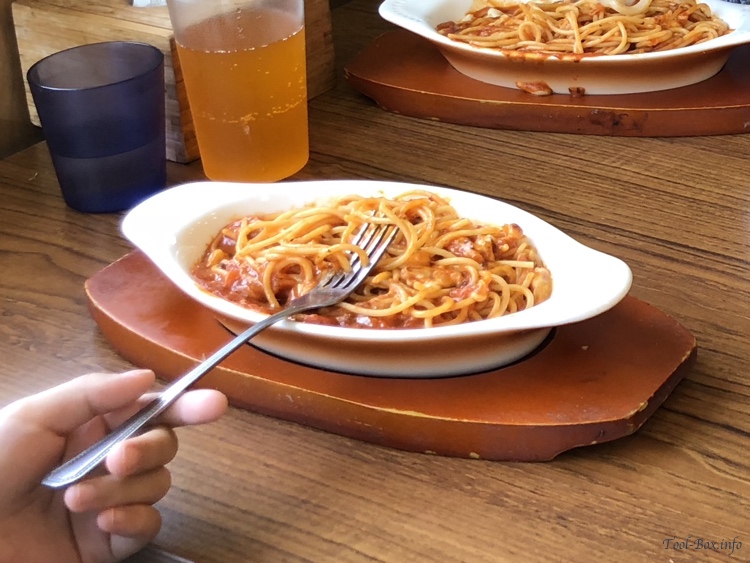
Oven-baked spaghetti looks innocuous at a casual glance

Indoor uses of thermographic imaging camera include finding leaks of heat or water, owing to the fact that people doing repairs may have the budget and the repeated usage that justify owning such a device. But as the cost to buy one goes down and the size becomes small enough to carry in a pocket, more uses come up. The one I found useful in raising kids is cooking and food safety. As you can see here, a bowl of spaghetti straight out of an oven didn't look particularly dangerous at first...

But the bowl is quite hot at over 85C, enough to cause a burn

But with FLIR ONE Pro, you could see that the handle was quite hot. The spaghetti itself was also sizzling at over 70C. This image served as a good way to teach my kids why they should be careful with a bowl that came out of an oven.
Continue reading "FLIR ONE Pro - Inside Uses"

FLIR ONE Pro - Impressions & Outside Uses

I have been a long time user of a FLIR ONE, an infrared thermographic camera module that connects to a smartphone. This type of camera visualizes the hot and cold spots of a subject by measuring infrared emissions. Such cameras are generally quite expensive, but by reducing it to just the camera module and relegating much of the operation to the connected smartphone, having it at a much lower price point became possible. That's how the FLIR ONE series came about.

More specifically, I own a first generation of the series, which is shaped to fit on an iPhone 5 or 5S only. Subsequent generations were redesigned to support a wide range of phones. So I was quite thankful to have given the chance by FLIR to test out the high-end version of their latest generation smartphone attachment - the FLIR ONE Pro. I was eager to see what sorts of improvements were made during the past few years.

Contents of the FLIR ONE Pro package

The product came in a colourful box that contained the main module, a USB-C charging cable, a compact carrying pouch, and some leaflets. The general style of the packaging had remained constant and professional, and the addition of a pouch was a nice touch since the module really shines when it can be brought to everywhere.

The quick start guide basically tells you to connect the module to your smartphone and install the FLIR ONE app. It is really a plug-and-go affair, so the simplicity is understandable. I do wonder if basic app functions could have been explained on paper a bit further, however.

Size of FLIR One 1st generation (top left) and FLIR ONE Pro (bottom right) compared with a transit card (bottom left)

Comparing to the first generation module, the look of the main component - the thermographic sensor and the regular camera bundle - hasn't changed much. However, the overall packaging has changed dramatically. The first generation was shaped to encase an iPhone 5/5S, so the long shape allowed it to house a large battery. It also has a recalibration / power switch next to the sensor bundle.

The FLIR ONE Pro, on the other hand, was designed to fit on a data/charging port of a phone and is smaller than a transit card. In order to accommodate thick phone cases, the length of the connector on the module is adjustable through the dial just below it. In order to make it compact, however, the integrated battery is much smaller and runs shorter than the first generation. There is a small power button at the bottom with status light. Automatic recalibration function did away with a need for a manual button.
Continue reading "FLIR ONE Pro - Impressions & Outside Uses"

FLIR One 1st gen on iPhone 6S Plus

Opening the packaging of the first generation FLIR One

A few months ago, I noticed that the first generation FLIR One thermal imaging module for iPhone 5 & 5S went on a bargain sale online for about US$110. Since the newer version and the competing products were two to three times more expensive I thought it would be a great chance to own a thermal imaging camera of my own and ordered one. Good thing I did, because as of this writing the price went back up so high that you'd be better off getting the newer version.

Mine arrived after a couple of weeks and I was already impressed with the nifty packaging. The product itself was also well-built and tightly integrated with my iPhone 5 once I put it into the provided case. Functionally, it works pretty much as advertised. You can see the thermal images of your environment through the phone's screen, with objects' contours enhanced using the images from a regular camera next to the thermal one. This technique, called MSX, is a way of mitigating a relatively low pixel count of the sensor (80 x 60 = 4,800). You have to recalibrate the sensor from time to time using a sliding switch next to it, which is slightly inconvenient at times.

FLIR One works fine with iPhone 5, as intended

Other device specifications limit the use of this module mostly to indoor use. The maximum range is about 30m (100 feet) and can only detect between 0°C to 100°C (32°F - 212°F). It does work quite well if you work within these limits, though. I can see where the heat leaks in my house and whether the floor heating is working properly, to give some examples.

To me, the fact that it works only with iPhone 5 or 5S out of the box was its biggest disadvantage because the larger iPhone 6 and 6 Plus series came out just two months after its official availability. FLIR did address this problem by releasing a second generation model a year later that solved the form factor problem (just plugs into the bottom of a phone) along with an upgraded pixel count (160 x 120 = 19,200) and range (-20°C to 120°C). It also does auto-calibration, boosting its convenience. But what about for those who already own one and upgraded to the newer iPhones?

You could use it on a spare iPhone, like I initially did, or modify it. There are aftermarket phone cases to fit an iPhone 6(S) or 6(S) Plus. But these require you to cut off the curved area to the side of the connector on the module so that they won't interfere with the wider width of these phones. Otherwise, the Lightning connector wouldn't go all the way in. But I did not like to mutilate it like this and decided to find another way.
Continue reading "FLIR One 1st gen on iPhone 6S Plus"

Tracking down electricity draw (Part 3)

Thermal imaging shows the air conditioner's standby power turning into heat

As the hunt for even more potential waste of power continued, I brought in the help of thermal imaging technology. By scanning each place with a thermographic camera attached to an iPhone (FLIR One; I'll write about this later) I can find any hot or cold spots that seem to be out of place.

One of such "hot" spots I found was on the side of an air conditioning unit. It wasn't being used, but standby power drawn from the wall outlet was slightly heating up the control circuit and was readily visible via thermal images. I could just pull the plug until summer, but I decided to take a step further.

Installing a wall socket with a switch so the air conditioner won't use standby power

I replaced the default wall outlet with the one that had an integrated switch. This way, I could cut the power from the outlet with a switch when the air conditioner isn't in use, instead of having to pull the plug. Not only would this be simple to operate, it would avoid the mechanical wear. I should have done this ages ago.

As part of my ongoing data collection, I then tried to measure how much power the air conditioners in the house would consume while trying to cool the house. Sadly, the rooms were not hot enough for them to start cooling the air. I'll have to check them out again when summer comes.
Continue reading "Tracking down electricity draw (Part 3)"

Copyright (C) 1996-2024 Woo-Duk Chung (Wesley Woo-Duk Hwang-Chung). All rights reserved.