Entries tagged as A1524

Apple Watch as an extension, stand-in

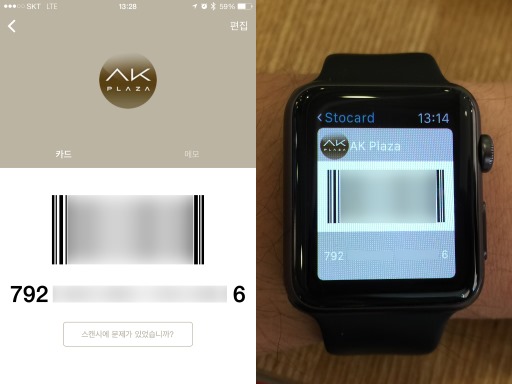
Loading membership card barcode via Stocard

As a smart device that's nearly always on your body, it has the potential to extend or replace existing things better than a smartphone, lessening the need to pull out or find the bulkier device to do the same thing. As I've moved to a fairly large smartphone - iPhone 6 Plus - this is something to look forward to.

One of those things I thought up was the flurry of membership cards that once occupied the wallet. Most of them now sit in a barcode form inside my iPhone, making the wallet considerably thinner. But now those could be moved to the Apple Watch, and I could just pull up my wrist to accrue reward points instead of reaching for my phone.

Because the Passbook app only sent QR codes to the watch, I looked around the Apple Watch App Store and found a couple of apps that can put the card number and the barcode on both types of devices. Eventually, I settled with Stocard, as you can see above. The cards stored on the iPhone app are automatically sync'ed to the Apple Watch app, enabling you to display the wanted barcode from either of the devices. Or, at least that was the idea.
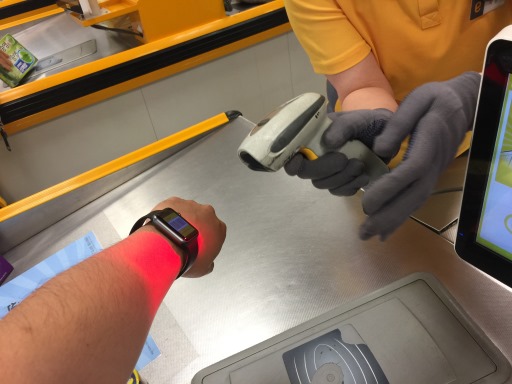
Barcode reader picks up from the tiny Apple Watch screen

As I loaded up the card data, I noticed that the barcodes were fairly small. It was only about 20.5mm (0.81") wide on my 42mm Apple Watch, which is even smaller than the UPC barcodes found on a product. I wondered if this would be scanned at all.

As a field test, I tried out on two of the biggest hypermarket franchises in Korea: Lotte Mart and Emart. To my surprise, the barcode readers at the stores were able to pick up the numbers without a problem as long as the reader was held close to the watch. The high-density 326ppi display may have helped this.

It's not all completely convenient at this point, though. Because the Apple Watch app has to rely on the iPhone to provide the data due to current SDK limitations, loading speed is slow with my 24-card collection. I have to load the app and make sure the barcode is up before going to the cashier. Hopefully, this will be resolved with the SDK updates later this year.
Continue reading "Apple Watch as an extension, stand-in"

Apple Watch's daily life tracking

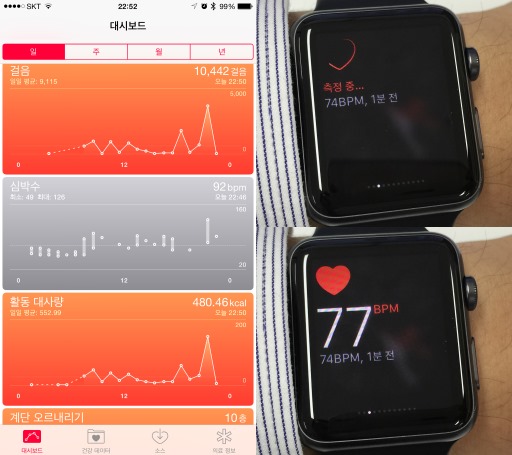
Apple Watch constantly logs you - Steps, Heart Rate, & Active Calories

One of the key selling points of the Apple Watch is that it acts as a fitness tracker. Indeed, it knows how much you moved around, what your heart rate is throughout the day, and how many active calories were consumed as a result. These data are all collected on the Health app on the paired iPhone.

While the watch is supposed to automatically check your heart rate every ten minutes, you can manually check using the heart rate "Glance" that you pull up from the main watch screen. This manual checking, which generates about four to five data points while the screen is active, is also logged.

I should note that the Apple Watch OS 1.0.1 update seems to have messed up the automatic checking a bit. Sometimes the measurements for a certain period are not sent and lost; at times the watch simply forgets to take measurements for several tens of minutes at a time. The worst case I've seen was having about 4 hours' worth of log missing, although this is rare and usually it's 1 to 2 hours at most. The problem isn't unique to me and it seems that Apple knows of the problem, so I hope it's fixed in the next update.

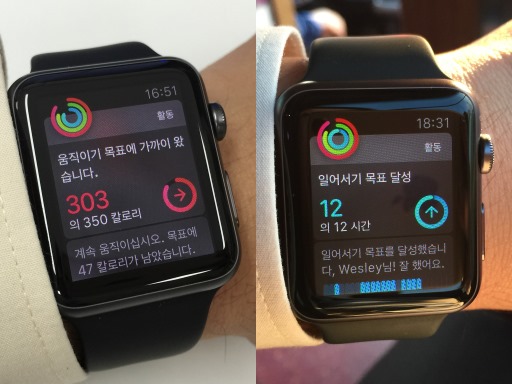
Apple Watch tells you the daily fitness progress, including Move (left) and Stand (right)

Apple Watch's way of tracking, notifying, and displaying fitness data is through three rings - Move (red), Exercise (yellow), and Stand (blue). You set your daily goals for each of the rings and the progress is shown by how much complete the rings are. It's simple yet clear.

By default, the watch tells you how you're doing every four hours, or when one of the goals are met. As for the Stand, it'll tell you to get up and walk around for about a minute at the 50th minute of the hour if it sees that you didn't move much at all for the hour. If you decide to closely follow the Apple Watch's motivation and suggestions, getting the ring filled up is relatively easy and probably makes you a bit healthier, too. I'm personally getting to move around and exercise more as a result.
Continue reading "Apple Watch's daily life tracking"

Getting the Apple Watch up & running

Replacing Apple Watch's sport band with a shorter one

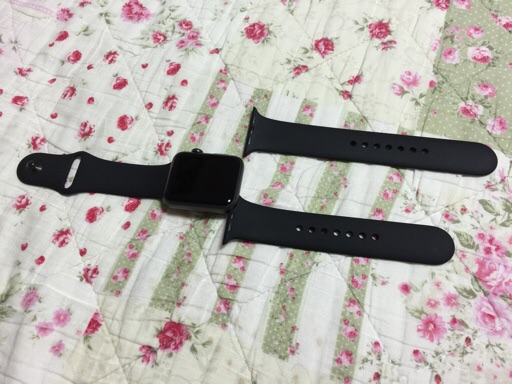
This post should have been up much earlier, but thanks to a week-long business trip it was inadvertently delayed. Anyways, going back to the day I got the Apple Watch two weeks ago, I noticed that the longer sport band was pre-installed on my 42mm version. I have a relatively thin wrist, around 170 to 175mm circumference, which is at the lower end of the Apple's 165 - 195mm range for most men. So I felt that a shorter one would do just fine.

Switching the band was quite easy. I just pressed the button at the back of the watch near the band and the band was slid out smoothly. Then I inserted the shorter band into place, after which the button clicked and the band was locked.

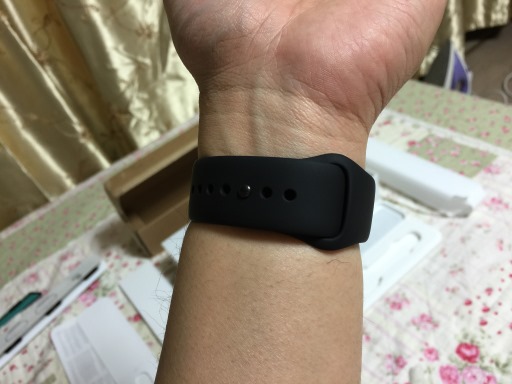
Checking the feel of the watch on the wrist

With the right band in its place, I put the watch on my wrist. Initially, I had the pin on the 3rd notch from the end as you can see here. After a day, I felt that the watch was put on too tight - there was a bit of an ache where the watch's back pressed on my wrist. So the pin was put on the 2nd notch thereafter.

This was much more comfortable, as the Apple Watch was able to shift around the wrist more. But this occasionally made the watch go into the locked state because it thought that it was no longer touching the wrist (more about locking in another post).
Continue reading "Getting the Apple Watch up & running"

Sun-ISS transit through telescope

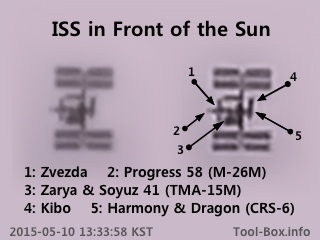
ISS photo from this solar transit was so clear that individual modules could be identified

It seems that I get to see a "great" transit of the ISS in front of the Sun once every year, with the space station appearing large enough to make it look like the letter H. This time, CalSky was predicting a nearly perfect condition at Naju, a near-center pass with an apparent diameter of more than one arc minute (63.1"). With the weather cooperating, I did not want to miss it.

To make sure I did not miss anything, I took out both my Celestron telescope with the smartphone adapter and my SX50 HS camera. I was hoping that at least one of them would catch the occurrence. I hurried with the setup and had everything ready just barely. I let my iPhone 6 Plus start recording the view through the eyepiece of the telescope in 240fps slow motion video, and pushed the shutter on my SX50 HS in continuous shoot mode, all mere moments before the transit.


The SX50 HS captured just one frame, which was sort of expected. The quality was easily better than my previous attempts thanks to the large apparent size. But the real deal was in the iPhone 6 Plus. It had captured 80 frames of the ISS in motion in total, with each frame besting the SX50 HS's efforts. The 240fps video capture truly shined, creating this smooth slow motion video as a result.

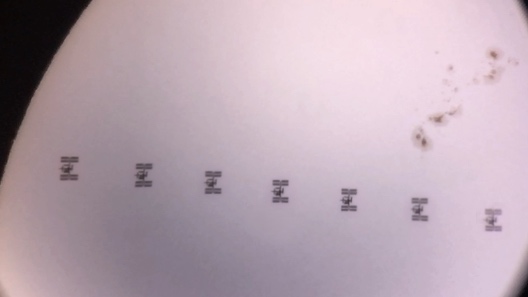
Composite of the ISS passing near the sunspot AR 12339

Here's the stacked and post-processed composite of the video in a single picture; click it to see it in full resolution. You can appreciate the details of the ISS and the sunspot AR 12339 quite better this way. If you look at the space station up close as seen in the first picture of this post, it's good enough to identify its major features. I've marked them for your convenience.

Telescope: Celestron NexStar 6SE + 25mm eyepiece + 2.5x barlow
Device: iPhone 6 Plus (afocal)
Settings: 29mm - 1280x720 - 240fps - f/2.2
Filters: None
Time: 2015-05-10 13:33:58 KST
Location: Naju, Korea
Stacked with RegiStax 6.1.0.8
- #1: 12 photos
- #2: 10 photos (ISS, each) / 100 photos (Sun)

iPhone camera burst mode snaps Saturn

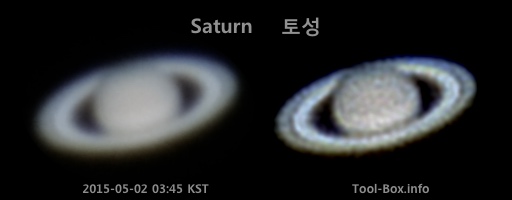
More details become visible in this Saturn shot

Last attempt to photograph Saturn with my iPhone was far from optimal. But the conditions were much better this time and I hoped to get a clearer picture. I had the Snapzoom adapter hold the iPhone 6 Plus on the Celestron telescope and started recording the visuals of Saturn.


Initially, I used the video mode on the default camera app as I've done with Jupiter a few days ago, but I decided to try the burst mode photos as well. I took 400 photos in the span on 40 seconds. The above is the result - it seemed to produce a better result because of the higher data rate. So I used this to produce a composite photo.

After doing the stacking and post-processing, I was able to get the most detailed look of Saturn yet. The Cassini Division came out sharper and the lighter band at the middle of the surface became visible, besting the results from SX50 HS. A more stable atmosphere and a higher quality eyepiece may help even further in the future.

Telescope: Celestron NexStar 6SE + 5mm eyepiece
Device: iPhone 6 Plus (afocal)
Settings: 29mm - ISO 640 - 1/15s - f/2.2
Filters: None
Time: 2015-05-02 03:44-45 KST
Location: Naju, Korea
46 photos stacked with RegiStax 6.1.0.8

Copyright (C) 1996-2025 Woo-Duk Chung (Wesley Woo-Duk Hwang-Chung). All rights reserved.