Entries tagged as sensor

FLIR ONE Pro - Impressions & Outside Uses

I have been a long time user of a FLIR ONE, an infrared thermographic camera module that connects to a smartphone. This type of camera visualizes the hot and cold spots of a subject by measuring infrared emissions. Such cameras are generally quite expensive, but by reducing it to just the camera module and relegating much of the operation to the connected smartphone, having it at a much lower price point became possible. That's how the FLIR ONE series came about.

More specifically, I own a first generation of the series, which is shaped to fit on an iPhone 5 or 5S only. Subsequent generations were redesigned to support a wide range of phones. So I was quite thankful to have given the chance by FLIR to test out the high-end version of their latest generation smartphone attachment - the FLIR ONE Pro. I was eager to see what sorts of improvements were made during the past few years.

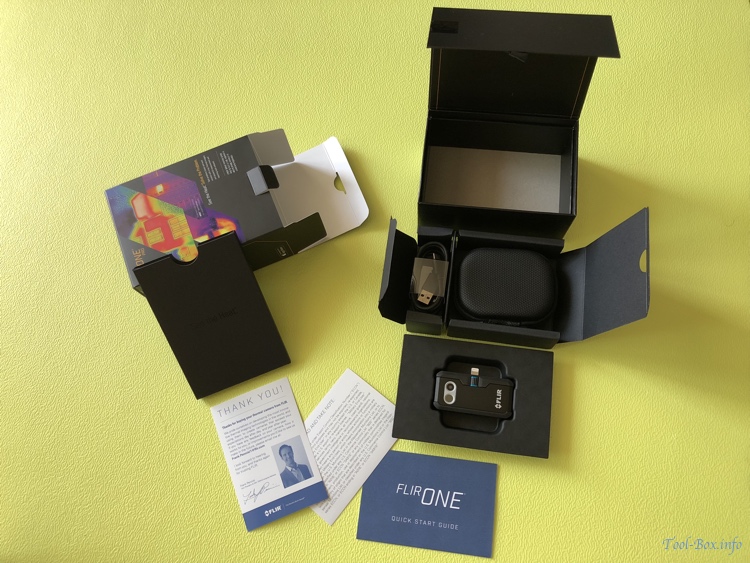
Contents of the FLIR ONE Pro package

The product came in a colourful box that contained the main module, a USB-C charging cable, a compact carrying pouch, and some leaflets. The general style of the packaging had remained constant and professional, and the addition of a pouch was a nice touch since the module really shines when it can be brought to everywhere.

The quick start guide basically tells you to connect the module to your smartphone and install the FLIR ONE app. It is really a plug-and-go affair, so the simplicity is understandable. I do wonder if basic app functions could have been explained on paper a bit further, however.

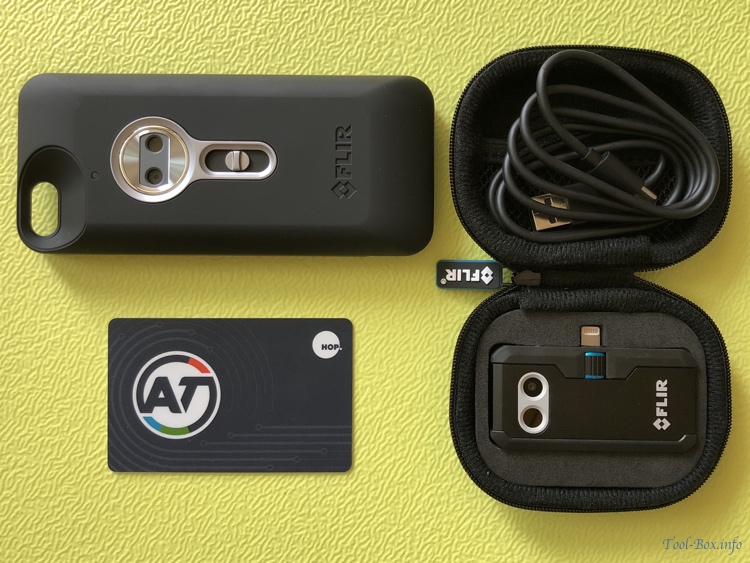
Size of FLIR One 1st generation (top left) and FLIR ONE Pro (bottom right) compared with a transit card (bottom left)

Comparing to the first generation module, the look of the main component - the thermographic sensor and the regular camera bundle - hasn't changed much. However, the overall packaging has changed dramatically. The first generation was shaped to encase an iPhone 5/5S, so the long shape allowed it to house a large battery. It also has a recalibration / power switch next to the sensor bundle.

The FLIR ONE Pro, on the other hand, was designed to fit on a data/charging port of a phone and is smaller than a transit card. In order to accommodate thick phone cases, the length of the connector on the module is adjustable through the dial just below it. In order to make it compact, however, the integrated battery is much smaller and runs shorter than the first generation. There is a small power button at the bottom with status light. Automatic recalibration function did away with a need for a manual button.
Continue reading "FLIR ONE Pro - Impressions & Outside Uses"

Today’s “The Toon-Box”

Defined tags for this entry: , , ,

The state of HomeKit in iOS 10

Apple HomeKit platform goes back to iOS 8. It was not very fleshed out at the time, needing more polishing over the years. Last notable change to HomeKit was made in 10.2, which enabled device notifications. This, along with other improvements in iOS 10, led me to think that HomeKit was finally in a "usable" state. Thus I have invested in the HomeKit ecosystem since early April of this year, around when iOS 10.3.1 came out.

As I gathered enough tangible material to share, I did a 5-part write-up of my HomeKit experience, spanning sensors, lighting, and energy control. I felt that my 5-month experience in a non-American environment may be of use to many people who are considering the platform.

1. Moving to Apple HomeKit with Elgato Eve
2. Philips Hue adds light to the HomeKit setup
3. Controlling 220V Power & Light with HomeKit
4. How much power does HomeKit use?
5. On installing and configuring HomeKit lighting


But now, big changes are coming in the coming weeks. Most notably, the GM(Golden Master, finished version) of iOS 11 will come out in two weeks, as Apple's new iPhone announcement will be made on September 12, 2017. It will contain significant improvements for HomeKit. As noted in the 5th post, Philips will expand the range of Hue products that will be recognized in HomeKit. Elgato has announced five new HomeKit products including lock and smoke detector.

All this means that my iOS 10-based HomeKit write-up should be wrapped up at this point. I'll come back to this topic as the dust settles and I had my hands on the new features and products.

On installing and configuring HomeKit lighting

Regular light switch installation and its circuit diagram

There are some things to consider and take action when you're installing smart lighting, HomeKit enabled or not, around the house. For the light switches, the biggest concern is the presence of a neutral wire. In most cases, you need this for a smart switch to function, but many switch boxes omit this and make things complicated. To see why things are like this, we need to take a look at the circuit diagram.

For a light to turn on, it has to connect to both ends of a power source. This is generally a single-phase AC power, which can be derived from a 3-phase AC power by using one of the phase wire and a neutral point. The wire connecting to the neutral point becomes the "neutral (N)" and the phase wire, the "live (L)" as seen in the diagram.

With a regular switch, all you need to do is to connect or break the connection between the live wire and the "load" wire leading up to the lamp. Therefore, a switch box only needs to have the live wire and one or more load wires coming out of it. Number of load wires correspond to the number of controllable light fixtures, of course. Neutral wire could also be present, but it wouldn't be connected to anything because there is no need to.

Smart light switch installation and its circuit diagram

The situation becomes different with a smart light switch. In order for the control module in the device to work, it also needs to connect to both ends of a power source, but at all times and independent of the lighting. As the live wire is already present, we need to add the neutral wire to the device as seen in the circuit diagram. With this configuration, the switch connected to the live wire and the load wire could be controlled either manually or by the control module. This is the reason why most smart light switches require the neutral wire.

The rare exceptions that can forgo the neutral wire have the control module connect between the live and the load wires. The module itself consumes little power and a very low current leaks through the load wire in the "off mode" so as to effectively prevent the lighting from turning on. But this generally requires the lighting load to be sufficiently large. If not, the leaked current may cause the lighting to flicker or cause other problems. In other words, this solution isn't as widely compatible as the switches using a neutral wire.
Continue reading "On installing and configuring HomeKit lighting"

Moving to Apple HomeKit with Elgato Eve

Months into using the SKT Smart Home as the home IoT system, several shortfalls such as the lack of interaction beyond the main app and no actual user-side ownership of data left me feeling unfulfilled. Meanwhile, Apple's own home IoT efforts, HomeKit, had been maturing and being quite an Apple enthusiast, I thought this may be a good time to give it a try.

First appeared on iOS 8 in 2014, HomeKit finally got its own system app "Home" and a place in the Control Center with iOS 10, along with notification from accessories (iOS 10.2) and geofencing support. With the upcoming iOS 11, it's set to become even more powerful, supporting more accessory types, per-user geofencing, better timing options (offsets and delays), shorter Bluetooth LE latency, and hobbyist development of accessories.

Stepping into the Apple HomeKit world with Elgato Eve sensors - Weather, Door & Window, and Motion

For my first HomeKit accessories, I picked up several types of Elgato Eve sensors during my Fukuoka visits in April. Eve Weather tracks the outside temperature, humidity, and air pressure. Eve Motion senses human movement up to 9 meters in the 120 degrees' field of view. Eve Door & Window detects the opening and closing of openable items. They seemed to be good starting points for future expansion because they provide sensor data that can trigger actions.

Now, the reason why I bought them in Japan is because most of the HomeKit-enabled accessories are not sold in Korea at the moment. They are most prominently available in the U.S., but this means that anything that runs off AC power like power plugs and light switches are often 120V-only, incompatible with the 220V outlets. Battery-powered ones can be found with relative ease in many Eurasian countries. For now, I'm sourcing various accessories from the U.S., Germany, and Japan.

FYI, the sensor series for Elgato Eve are most widely available around the world and you should compare the prices when buying them from overseas. Price in Japan isn't particularly favourable, so you should pick them up from physical stores only if you're already visiting the country for other reasons.

Hayun inserts the AA batteries into Eve Weather

Eve sensors are battery operated, so they can be installed freely around the house. What's more, batteries in these sensors last at least a year according to Elgato, so they need little maintenance. More than two months into their use, battery indicators have barely budged. Should the batteries eventually run out, Eve Weather and Eve Motion use standard AA batteries, so they are cheap and easy to replace.
Continue reading "Moving to Apple HomeKit with Elgato Eve"

Copyright (C) 1996-2024 Woo-Duk Chung (Wesley Woo-Duk Hwang-Chung). All rights reserved.