Entries tagged as iPhone 6S Plus

Mars and Saturn near opposition

Mars and Saturn as seen on May 23, 2016 (100% size)

This morning, not long after midnight, I gazed the southern sky to find the planets Saturn and Mars near the full Moon. These planets were both near their oppositions - it was just 11 days away for Saturn and Mars went through it less than 6 hours ago. You don't see their oppositions happening close together often because Mars opposition happens every 25 to 26 months, while it's around 12 months and 2 weeks for Saturn. The next time the two occurring within two weeks of each other is in 2082, when it's 4 days apart (Saturn: August 29, Mars: September 2).

I attached my iPhone 6S Plus onto the Celestron X-Cel LX 9mm eyepiece that I bought relatively recently to observe the planets in more detail. It was the first time both were used on the telescope for astrophotography. They both worked as expected and produced the images you see above. The brightness of the Moon nearby may have washed out a bit of detail, but other than that it turned out fine. I may have to try out using filters next time to see if it makes any difference.

Telescope: Celestron NexStar 6SE + X-Cel LX 9mm eyepiece
Device: iPhone 6S Plus (afocal)
Filters: None
Location: Naju, Korea
Stacked with PIPP 2.5.5 and RegiStax 6.1.0.8

Saturn
Settings: 29mm - ISO 125 - 1/20s - f/2.2
Time: 2016-05-23 01:58 KST
31 photos

Mars
Settings: 29mm - ISO 32 - 1/90s - f/2.2
Time: 2016-05-23 02:04 KST
100 photos

The only thing that I carry is everything

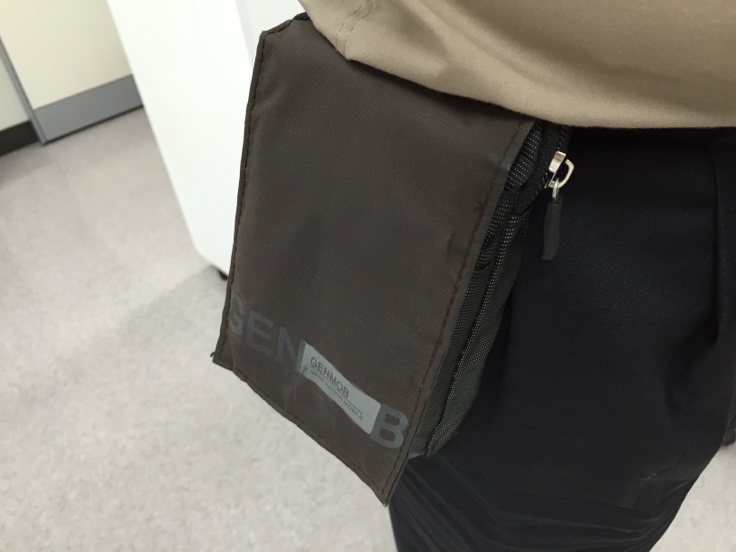
Wearing my all-inclusive belt bag on my waist

Nearly a decade ago, you would have seen me wearing all sorts of gadgets around my waist, as evidenced by this television broadcast. The problem with this was clearly illustrated in that video - it takes a bit of time to put them all on the belt, however useful they may be.

I haven't let go of the carry-them-all attitude, but things have worked in my favour. A lot of the gadgets I had to carry separately were now integrated into a single device (smartphone). That meant less stuff to carry, and I was able to reduce the number of pouches and bags on the belt over the years. I ended up with a phone and an external battery each in a holster, and a bag that held adapters, cables, and other miscellany.

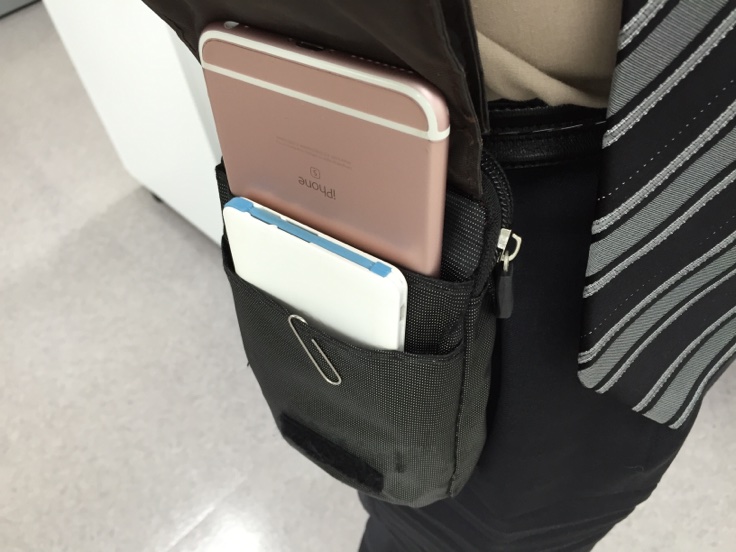
iPhone 6S Plus and external battery are easily accessible

But then large iPhones came along. When I put it on my belt, it occupied a sizable area of my waist. This got me thinking: since the phone is thin enough, maybe I could put it in a belt bag that can store other stuff with it. And this is how I now just have this one bag hanging from my waist.

As you can see here, my iPhone 6S Plus and the slim external battery fit nicely into the front pockets of the bag. They're accessible by opening up the flap usually held in place with a hook-and-loop fastener. I also have a paper clip there in case I need to change the SIM card or poke a reset button.

Of course, there's a lot more hiding behind. Let's take a look at the rear compartment.
Continue reading "The only thing that I carry is everything"

FLIR One 1st gen on iPhone 6S Plus

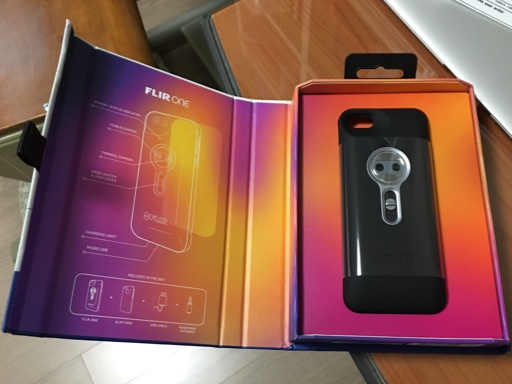
Opening the packaging of the first generation FLIR One

A few months ago, I noticed that the first generation FLIR One thermal imaging module for iPhone 5 & 5S went on a bargain sale online for about US$110. Since the newer version and the competing products were two to three times more expensive I thought it would be a great chance to own a thermal imaging camera of my own and ordered one. Good thing I did, because as of this writing the price went back up so high that you'd be better off getting the newer version.

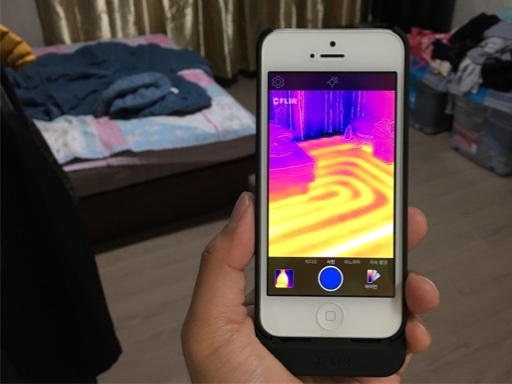
Mine arrived after a couple of weeks and I was already impressed with the nifty packaging. The product itself was also well-built and tightly integrated with my iPhone 5 once I put it into the provided case. Functionally, it works pretty much as advertised. You can see the thermal images of your environment through the phone's screen, with objects' contours enhanced using the images from a regular camera next to the thermal one. This technique, called MSX, is a way of mitigating a relatively low pixel count of the sensor (80 x 60 = 4,800). You have to recalibrate the sensor from time to time using a sliding switch next to it, which is slightly inconvenient at times.

FLIR One works fine with iPhone 5, as intended

Other device specifications limit the use of this module mostly to indoor use. The maximum range is about 30m (100 feet) and can only detect between 0°C to 100°C (32°F - 212°F). It does work quite well if you work within these limits, though. I can see where the heat leaks in my house and whether the floor heating is working properly, to give some examples.

To me, the fact that it works only with iPhone 5 or 5S out of the box was its biggest disadvantage because the larger iPhone 6 and 6 Plus series came out just two months after its official availability. FLIR did address this problem by releasing a second generation model a year later that solved the form factor problem (just plugs into the bottom of a phone) along with an upgraded pixel count (160 x 120 = 19,200) and range (-20°C to 120°C). It also does auto-calibration, boosting its convenience. But what about for those who already own one and upgraded to the newer iPhones?

You could use it on a spare iPhone, like I initially did, or modify it. There are aftermarket phone cases to fit an iPhone 6(S) or 6(S) Plus. But these require you to cut off the curved area to the side of the connector on the module so that they won't interfere with the wider width of these phones. Otherwise, the Lightning connector wouldn't go all the way in. But I did not like to mutilate it like this and decided to find another way.
Continue reading "FLIR One 1st gen on iPhone 6S Plus"

Now switching light bulbs to LED

So we're getting LED bulbs, too?

After successfully deploying LED lamps across the FPL lamp fixtures, I thought that the lamps installed in the traditional screw-in sockets should be replaced as well. Ever since these lamps started to go mainstream about 5 years ago, the price kept dropping and the choices kept on growing. This meant that it was a good time to make the move.

Comparing the various offerings on the market, I ultimately settled on the BEAM series of lightbulbs from Sigma LED (formerly Sunsea). They were among the brightest for the rated power, yet priced competitively. Both the 8W and 10W versions cost me about US$3.75 (KRW 4,500) per bulb.

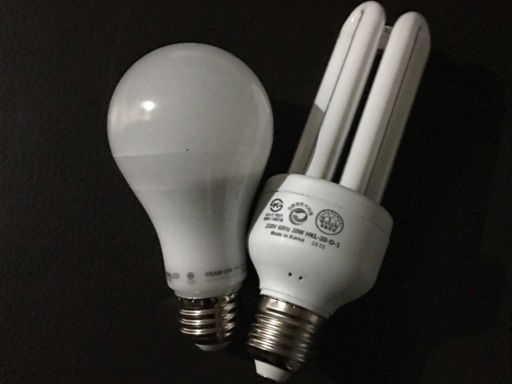
The new versus the not-so-old lightbulbs: Sigma LED and Hankuk CFL

They were set to replace the 20W compact fluorescent (CFL) bulbs made by Hankuk Lighting and installed throughout the house by default. Here is how they compare.

Name Type Dim. (mm) Power (W) Lum.Flux (lm)
Hankuk HKL-20-D-1 CFL E26 54⌀ x 161 20 1220
Sigma BEAM-10W LED E26 65⌀ x 122 10 1024
Sigma BEAM-8W LED E26 60⌀ x 108 8 744

The LED bulbs are shaped closer to the traditional incandescent bulbs, making them thicker and shorter than the CFL ones. Because of the larger diameter, some of the fixtures that were designed only with the CFL in mind may have trouble taking in the 10W ones. This is why I got 8W ones as a fallback.

Meanwhile, the spec comparison reveals a similar trend seen with the longer cousins. The LED bulbs meant to replace the CFL comes in at about half the power consumption and slightly lower total amount of light. I'll be checking if the reality reflects these numbers, of course.
Continue reading "Now switching light bulbs to LED"

Switching home lighting from FPL to LED

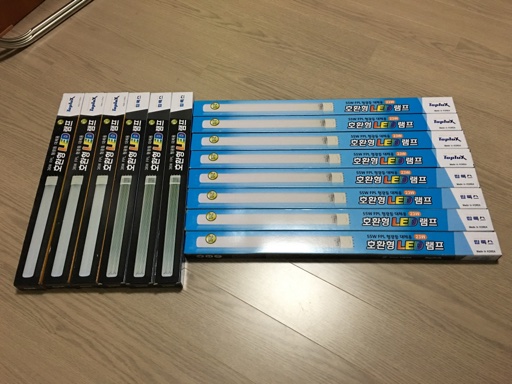
Fluorescent light replacement LED lamps from TopLux - 14 in all

Having a smart meter giving real-time power consumption data provided a lot of insights for my home. The baseline load when everything is idle is about 80W, and the refrigerator running at full power adds 90W to that. So when I noticed that more than 300W were being used during the evening hours even with the TV turned off, I had to track down what the culprit was.

It turned out that the sole reason for this uptick was the lighting. Fluorescent lights in the living room and the study room were turned on for several hours every day and contributing much to the total consumption. Knowing that LED lights were more efficient and that the price has come down a lot recently, I decided to make some major investment.

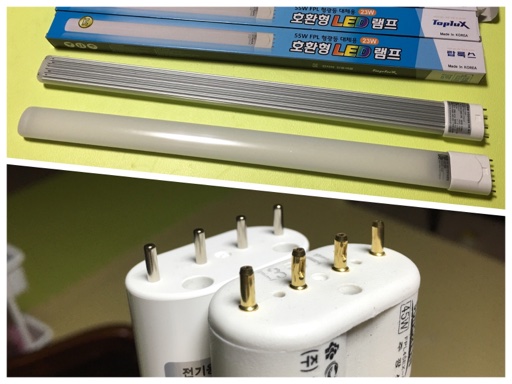
Front and back of the LED lamp / comparison of the connector (back: LED / front: FPL)

As with a lot of apartments in Korea, the typical type of lighting installed was PL compact fluorescent lights, or FPL for short. It uses 4-pin 2G11 socket and has external ballast. Lots of replacement methods exist - lamp-only, ballast + lamp (socket is kept), or total replacement. As the lamp-only method is simplest by far and not much more expensive than replacing everything, the choice was obvious for me. I ordered the relevant LED lamps manufactured and sold by TopLux of Korea which were on sale - 23W version cost about KRW 21,000 (US$17.50) and 15W one, KRW 14,000 (US$11.70). Here is how they stack up with the existing FPL lamps.

Name Type Len. (mm) Power (W) Lum.Flux (lm)
Hyosun FPL45EX-D FPL 540 45 4060
TopLux FT23-57 LED 535 23 3400
Hyosun FPL32EX-D FPL 415 32 2600
TopLux FT18W-04-57A LED 415 15 2250

According to the specifications, the LED lamp consumes about half the power while putting out about 85% of total light, or luminous flux, compared to the similarly sized FPL counterpart. This is indeed quite an increase in efficiency if it delivers. Visually, one side of the lamp is taken up by a long heat sink and uses the same four-pin layout. The pins themselves are simply round, not dimpled in the middle like the FPL it's replacing, so I suppose it won't "hook in" quite as well.
Continue reading "Switching home lighting from FPL to LED"

Copyright (C) 1996-2024 Woo-Duk Chung (Wesley Woo-Duk Hwang-Chung). All rights reserved.